Hibernation!

It’s January, the snow is thick on the ground and the studio is rather chilly but it has been so good to have a month where I don’t have masses of commitments and can take stock a bit.

029

I started to run an evening class at Number Six in Pateley Bridge but, with only four students coming to the first session, we decided (with NYCC Adult Learning Services permission) to run the remainder of the course as three fortnightly 6 hour workshops. The course looks like it will soon be full and I have my Monday nights back without the prospect of having to drive over the moors in snow and ice every week so we’re all winners there! I taught a monotype workshop to the Northallerton Art Club last weekend and that was very enjoyable with seven creative people making some beautiful prints using direct drawn,  reductive & collage methods. Now I have the rest of the month and much of February free to make some new prints for my exhibitions in March, to work on my bookmaking for Joan Newall’s course and to slowly develop some of my ideas started in Sweden.

I was lucky enough to run into Heather and David Cook, both painter/printmakers, in Malham the other day and they kindly showed me some of their latest work and David discussed his brilliant exposure unit that he has made to make his Imagon plates. I’m hoping to make something similar so that I can continue my photopolymer experiments. So there are lots of plans afoot. The only problem is that it is winter! I actually quite like this time of year especially when we have sharp frosts or snow. As a fellrunner, I like nothing more than running through virgin snow and marvelling at the purity of the landscape but the downside is that during the rest of the time, I seem to slow right down!

039

I always look forward to January and February and the chance to work on some new projects and I imagine how much I’ll get achieved and how I’ll spend everyday making lots of exciting new things but the reality is that during the darkness hours, I’m sleepy and just feel like curling up with a book, some poetry or a good film. I’ve got a lovely stack of books to work through including two from Robert MacFarlane (The Old Ways & Mountains of the Mind), ‘Man with a Blue Scarf’ which is Martin Gayford’s diary of sitting for Lucien Freud, Memory Wall by Anthony Doerr, The Snow Tourist by Charlie English and I’m just part way through ‘If Nobody Speaks of Remarkable Things’. Added to that is regular dipping into the poetry of Kathleen Jamie and Norman MacCaig and random admiration of the prints in Carry Ackroyd’s ‘Nature Powers and Spells’ and you can see that I have plenty to keep me occupied!

Despite slowing down, I am still working on a new collagraph, taking a fox, the snow and the birch forests as inspiration, which will be for my exhibition ‘Telling Tales’ with Jane Littlefield at Rural Arts in March. I’ll be making a couple new bird prints too. I’m so used to working every hour available that it feels a bit lazy not to! I read in a fellow artist’s blog that she felt that when she made the shift to being a full-time artist, she was suddenly doing something that she had crammed into her spare time all of the time and she found it hard to know what to do with her leisure time. I feel like that. Art is what I do and I rarely switch off from it because I love it and everything around me is part of it. I am also totally self-supported so I have a strong drive to use all my available time to create the work that will keep me clothed, housed and fed!

However, I have decided to stop worrying about not burning the candle at both ends and enjoy this chance to recharge and take stock before the frenetic activity that will no doubt ensue in the coming months. I’m dividing my weeks into days for working on my prints from Sweden and researching what I need to get started with my photopolymer printing and make my exposure unit, days to make some new collagraphs for my exhibitions in March and the rest of the time to get somewhere with my bookmaking and do my admin. Joan taught us how to make lined boxes with lids in our last class and it has given me an idea for this year’s final project. The photo shows my box covered in my handmade paper. Our theme this year is ‘worn surfaces’ and I’m using ‘A Tale’ by Edward Thomas as my starting point. More on that in another post.

001

January also brings the dreaded tax return! Self-assessment online makes it a bit easier but the whole process is one that I don’t relish. I try and make it slightly more interesting by totting up which galleries have sold the most prints over the year and which prints have sold the best for me. This has the added benefit of reminding me which galleries I need to keep a special eye on. The ones that sell the best obviously need to have their stocks replenished regularly and sometimes if the managers are too busy to send out requests, the onus is on me to offer to deliver more work. The ones that aren’t selling need a phone call to find out if the prints are still on display and if anything needs returning or swapped.

In 2011/12, Cambridge Contemporary Art was my top selling gallery, hotly followed by The Gallery in Masham (Josie has been selling my prints consistently for 19 years and is invariably one of my best selling galleries!), then ArtsBank at Saltburn. All three galleries have a few things in common that I think make them not only successful, but a pleasure to work with. Firstly, I always know I will be paid for the prints that I’ve sold on or around a certain date of the following month, the paperwork is always thorough and I trust the people that I am dealing with. The gallery owners have very proactive publicity campaigns and are constantly updating their websites, sending out newsletters and using social media to promote exhibitions and their artists. I also get regular emails or phone calls to let me know if customers are interested in prints that are not currently in the galleries, to order more work from me and to offer me exhibiting opportunities. In return, I try really hard to promote the galleries when they put on exhibitions of my prints, always send detailed and clear paperwork with my deliveries and try and deliver any orders as soon as I can. The relationship is like any successful partnership, it requires trust and plenty of attention on both sides.

My list of gallery sales also shows me where some of the outlets aren’t performing very well and then I can decide what to do about it. This could be for all sorts of good reasons but ultimately, every print that sits unsold is a potential sale elsewhere and at one gallery, five of the unsold prints were the last in the editions so I was pretty keen to get them back and into one of my more successful outlets. It is quite hard when you sell your work across the UK because keeping an eye on it can be tricky and when I’m busy, I’m not always very good at keeping on top of this kind of thing so now is the time for doing any chasing up that needs doing. Some of the galleries only sell a handful of prints each year but so long as there are a few sales and I have a good relationship with the owner, I am happy to have my prints there. You never know who might see them and it is better to have them on a gallery wall than sat at home in my studio.

My top selling prints for 2011/12 were The Return (only one left):

The Return

A Flight of Swallows (still available):

a flight of swallows

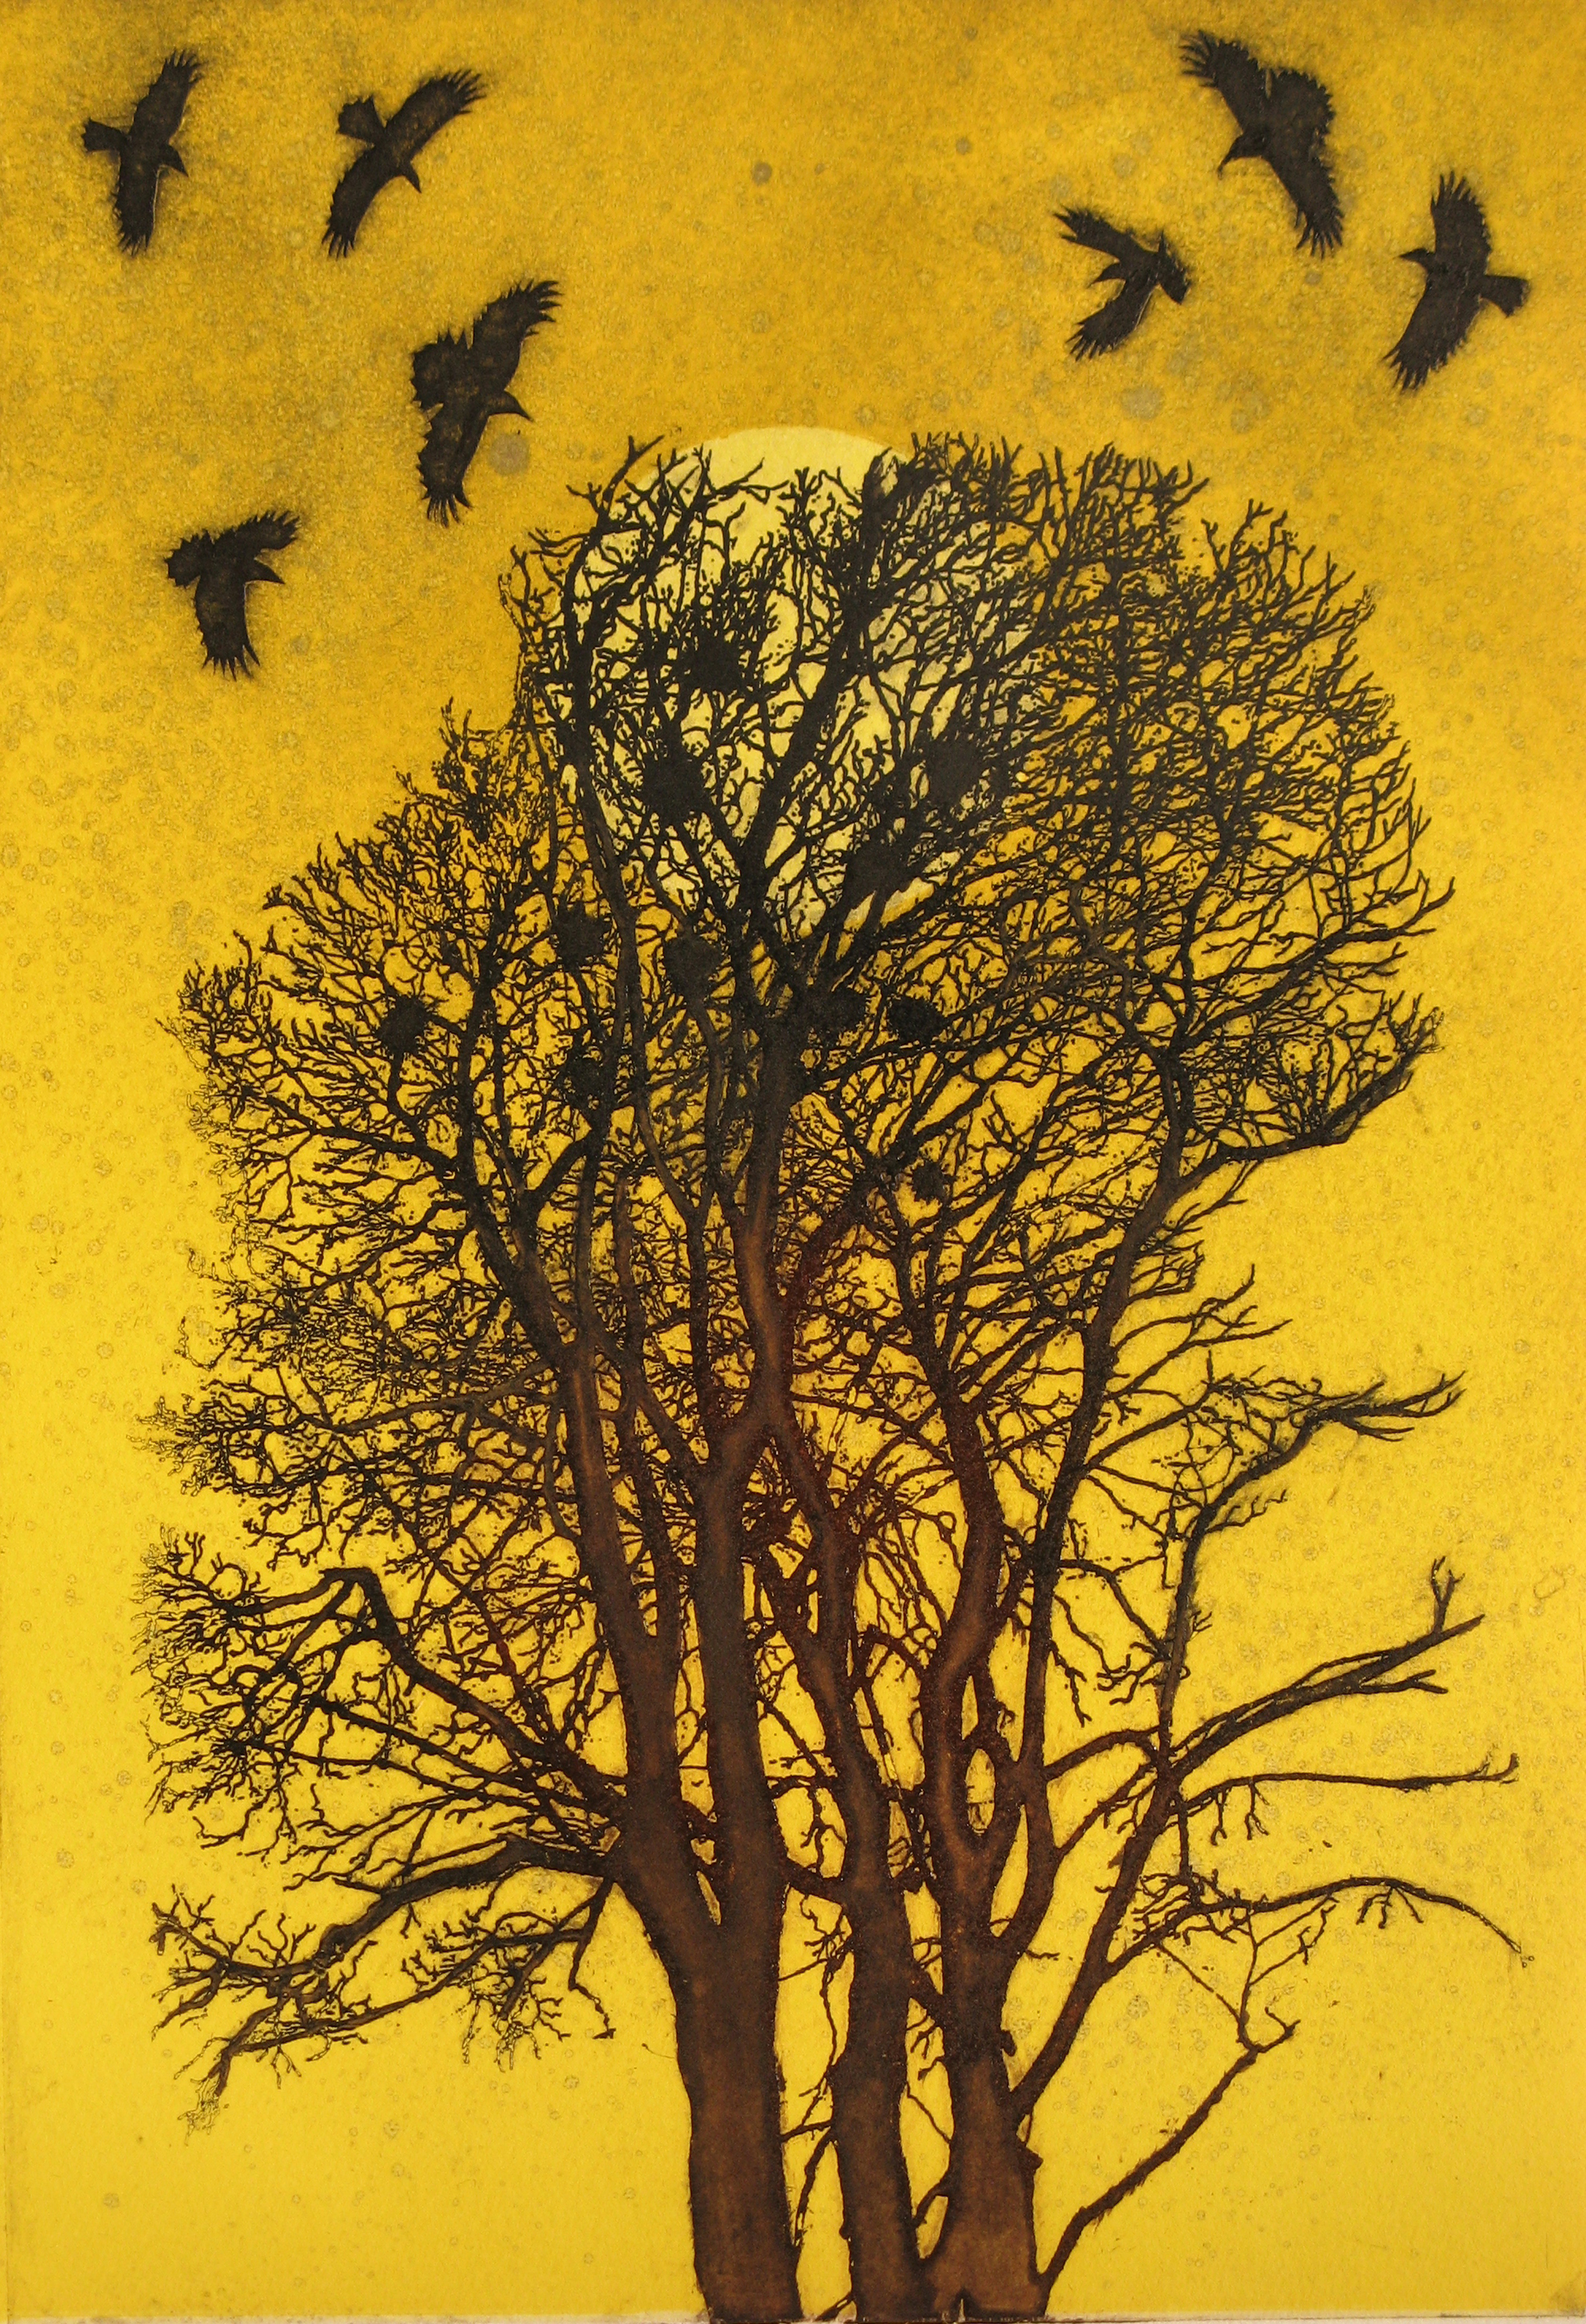
and in joint third, Rookery (which has sold out):

Rookery

and The Woodcat (still some available):

The Woodcat

So its a quiet time for me but a good one. I’m running most days to keep SAD at bay, keep me inspired and to enliven me for the time spent in my studio and I’m going to make the most of getting plenty of sleep and time to think before I’m back to busy times of eating on the move and midnight printing!

The Watcher

Happy new year everyone! I’m currently preparing and making plans for my printmaking in 2013. My main resolution is to be a bit more selective in the teaching that I take on and careful with the planning of my year so that I allow myself time to develop new ideas, get absorbed in my printmaking and undertake any projects that come up. I’ll write more about that in a future post but I did promise to tell you about the process of making a collagraph and so I’ll do that now 🙂

I’ve always been fascinated by hares and over the years I’ve made a series of collagraphs inspired by them. Many of these have been titled using names found in Seamus Heaney’s translation of a middle English hunting poem called ‘The Names of the Hare’. I am really fortunate to see hares regularly in the countryside where I live and I know a couple good places for watching up to fifteen of them at a time! I have taken numerous photos for reference and spend plenty of time just observing them. It has been a while since I’ve made a new hare collagraph, I seem to have been concentrating on birds lately, but The Lime Gallery in Settle asked me if I would consider creating some new designs for their winter exhibition ‘Feast’. From a purely commercial point of view, hares sell! There has been a huge increase in their popularity as a subject for artists and an ever growing group of customers desiring to own an image of one. From a personal point of view, I love them and making prints of them is never a chore!

hare

I decided to combine another favourite with the hare, an umbellifer. Plants such as Cow Parsley, fennel, dill and angelica have beautiful flower and seed heads that have an architectural quality.

I ought to say a quick word about what a collagraph is. In the true sense of the word, a collagraph is a print made from a collage but it has become a more general term for mixed-media printmaking. In my opinion, it is the most diverse method of making prints. Collagraphs can be printed in relief or intaglio but I prefer to print intaglio. This is when you apply ink to the indented surface of the plate and wipe the excess away from the raised surface. Dampened paper is then laid on top of the plate and passed through a press so that the pressure forces the soft paper into all the nooks and crannies and transfers the ink to create the image. You start with a thin base plate of card, wood or metal and apply textures to the surface (you can also cut into it) and the rougher the texture, the more ink that will be held and darker the tone that is created. If you apply smooth surfaces, they will wipe more cleanly and create a lighter area. An infinite number of materials can be used to create a collagraph plate and part of the fun comes from experimentation.

I always start my designs by doing some rough thumbnail drawings in my sketch book and then I work up the ones that I like best with a bit more detail before settling on my preferred composition.

022

I also hold the sketch up in the mirror so that I can see whether the design works well in reverse (intaglio prints always come out as the reverse image of the plate) and so that I can spot any defects in the drawing. This usually results in a few changes before I start to cut the plate. When I am happy with the design, I trace it using a well-sharpened soft pencil and then turn the tracing paper face down onto the cardboard and burnish the back with a harder pencil or bone folder to transfer the image. This means that you automatically reverse your original drawing and will end up with a print that looks the way round that you intended it to be. I use mountboard as my base plate because it allows me to both paint and collage onto the surface but also cut into it and peel sections away.

The next stage was to apply acrylic gesso to the areas that I wanted to be textured. I use gesso a lot because it holds the brush marks well and you can draw into it when it is wet to create design details.

024

I then let the gesso dry totally before cutting into it to create further fine detail. When that is done, I often apply small areas of pva glue to create highlights. The pva dries to a very smooth surface and so the ink wipes away cleanly leaving white areas.

The next step was to score around the outline of the hare, the sun and the umbellifers and peel away the background. I used a very sharp surgical scalpel and changed the blade regularly. I scored into the board just deeply enough to cut through the top layer of paper so that it can be peeled away to reveal the rougher texture beneath. This will print as a mid-tone.

026

Once the cutting was done, it was time to cut another layer in to add a bit of depth. In this case, I cut a further couple umbellifers. These print as a darker tone to the background.

Once the plate was completed, it had to be sealed with varnish. I used button polish. This is a shellac based furniture polish that seals the plate perfectly but does not diminish the detail. I sealed both sides and the edges and let the varnish dry overnight to make sure it is totally hardened. At this stage, I also cut the background plates that I planned to use in conjunction with the collagraph plate. For my new hare I used a blank piece of card cut to exactly the same size which I planned to roll up in a blend of colour to create a coloured background to print the detail onto.

When the plates were sealed it was time to ink, wipe and print them. I already had a clear idea of what colours I wanted to use and started by rolling up a blend of raw sienna and white which I then rolled onto the base plate.

031

I then printed the rolled up plate onto dampened and blotted paper using my etching press. I made sure the paper was damp because it needs to be wet for printing intaglio and if I had printed the relief block on dry paper, it would have then expanded when I dampened it for the next stage and it would not have registered properly.

Once I’d printed the bottom layer, I applied raw sienna, white and sepia à la poupée to the collagraph plate. I always apply the ink using my fingers so that I can feel if the plate has any loose sections that need re-gluing. I use nitrile milking gloves to protect my hands and then I can just take those off when I need to handle the paper. Once the whole block was covered in ink, I carefully wiped the top surface using pieces of an old phone directory. I used the flats of my fingertips and a polishing motion to ensure that the ink didn’t get rubbed out of the indentations.

029

Once the plate was wiped, I placed the already printed block of colour face up on the bottom blanket of my etching press. This is a bit unorthodox but allows me to register my prints easily by eye. I was then able to carefully place the inked and wiped collagraph plate face down onto the block of colour, lay some acid free tissue over the top and the rest of the blankets on top of that. I then wound the whole lot through the press. Then came the exciting part of revealing the first proof 🙂

034

I was really pleased with the result. It came out just the way I wanted it to! However, something was missing and I couldn’t put my finger on it for a while until I realised. I’d forgotten his whiskers! This was easily remedied by a few quick cuts with the scalpel to the collagraph plate and the rest of the batch came out fine. You have to repeat the whole inking and wiping process every time you make a print.

The Watcher

So here he is, ‘The Watcher’. I’ve already sold a few so I hope he will be popular.

On a final note, my lovely boyfriend surprised me on Christmas day with a hare! We had been looking at the wonderful feltwork by Emma Fountain at the October craft fair, ‘Crafted by Hand’ in Masham and I’d fallen in love with a beautiful large hare she’d made. Brian later searched for Emma on the internet and secretly commissioned her to create me my own moongazing hare. It was a total surprise and I’m thrilled to bits. Here is a picture:003