New Ground: Part 2

cdc752b7-98d3-4db6-b187-addd70c4bfc6
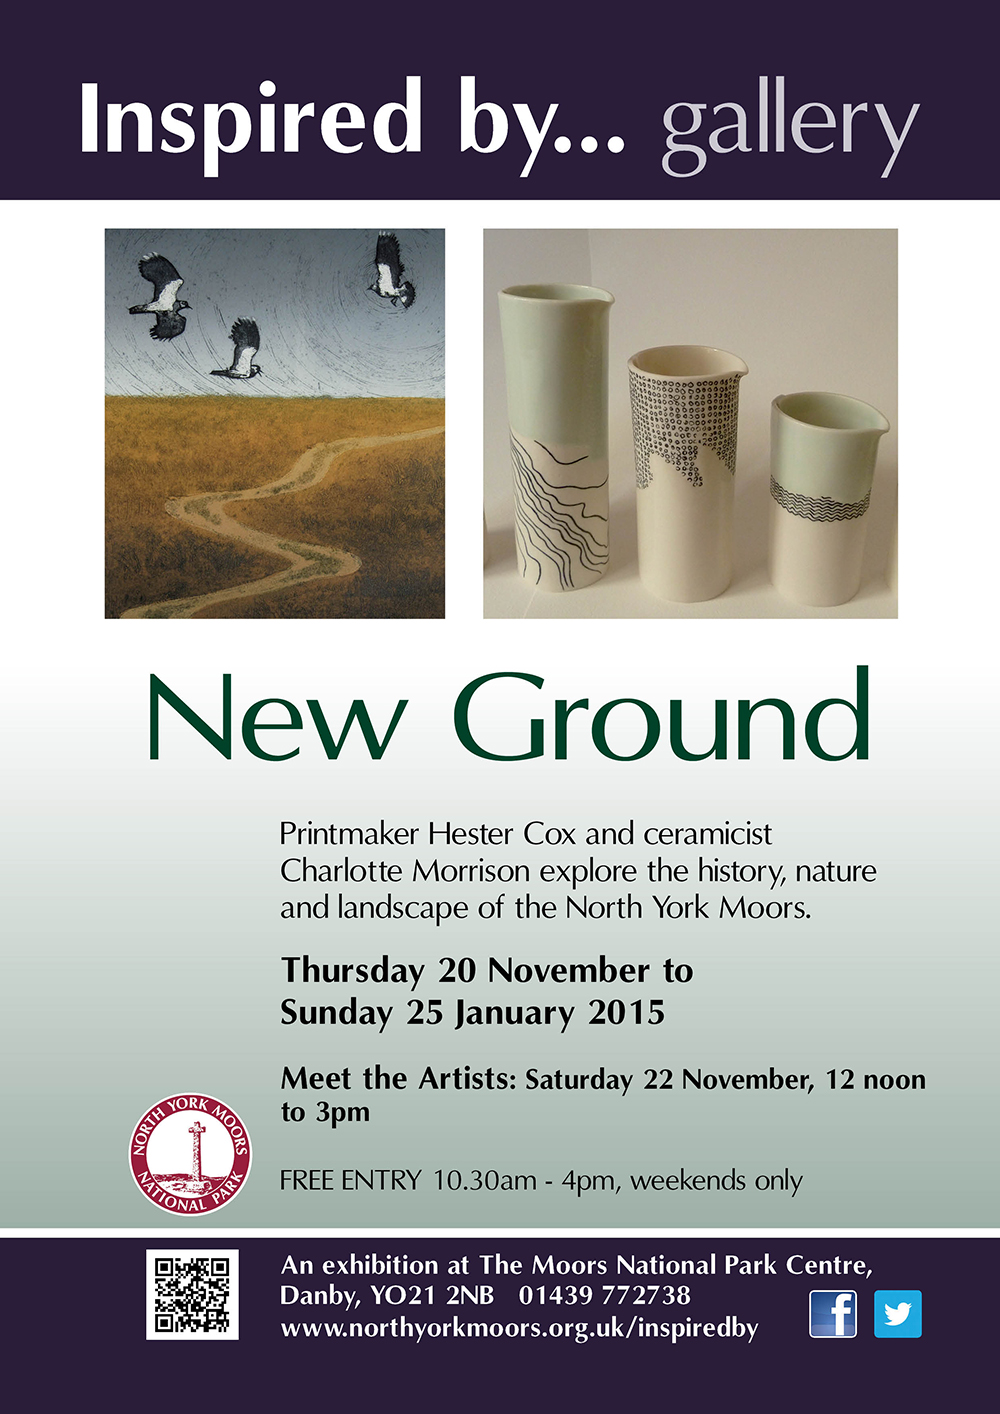
My exhibition with ceramicist Charlotte Morrison is now up and running at Inspired By…Gallery in Danby. It is open daily 10.30am – 4.00pm until Christmas Eve and then it reopens for the 1st-4th January before becoming weekends only throughout January. The prints on show are a mix of collagraphs, intaglio photopolymer prints and a set of monotypes combined with drypoint. I had lots of ideas for images to create but, as usual, time restrictions and other commitments meant that I had to go with the ones that just couldn’t be shaken whilst postponing some of the others for another time. It would mean writing an essay for me to describe all of the images on show and to explain their origins but there are a few key pieces that I’ll mention here. Charlotte has created some beautiful collections of vases, cups and jugs based on old pathways, drovers roads etc. in the North York Moors national Park. Visit her website to see more of her work.

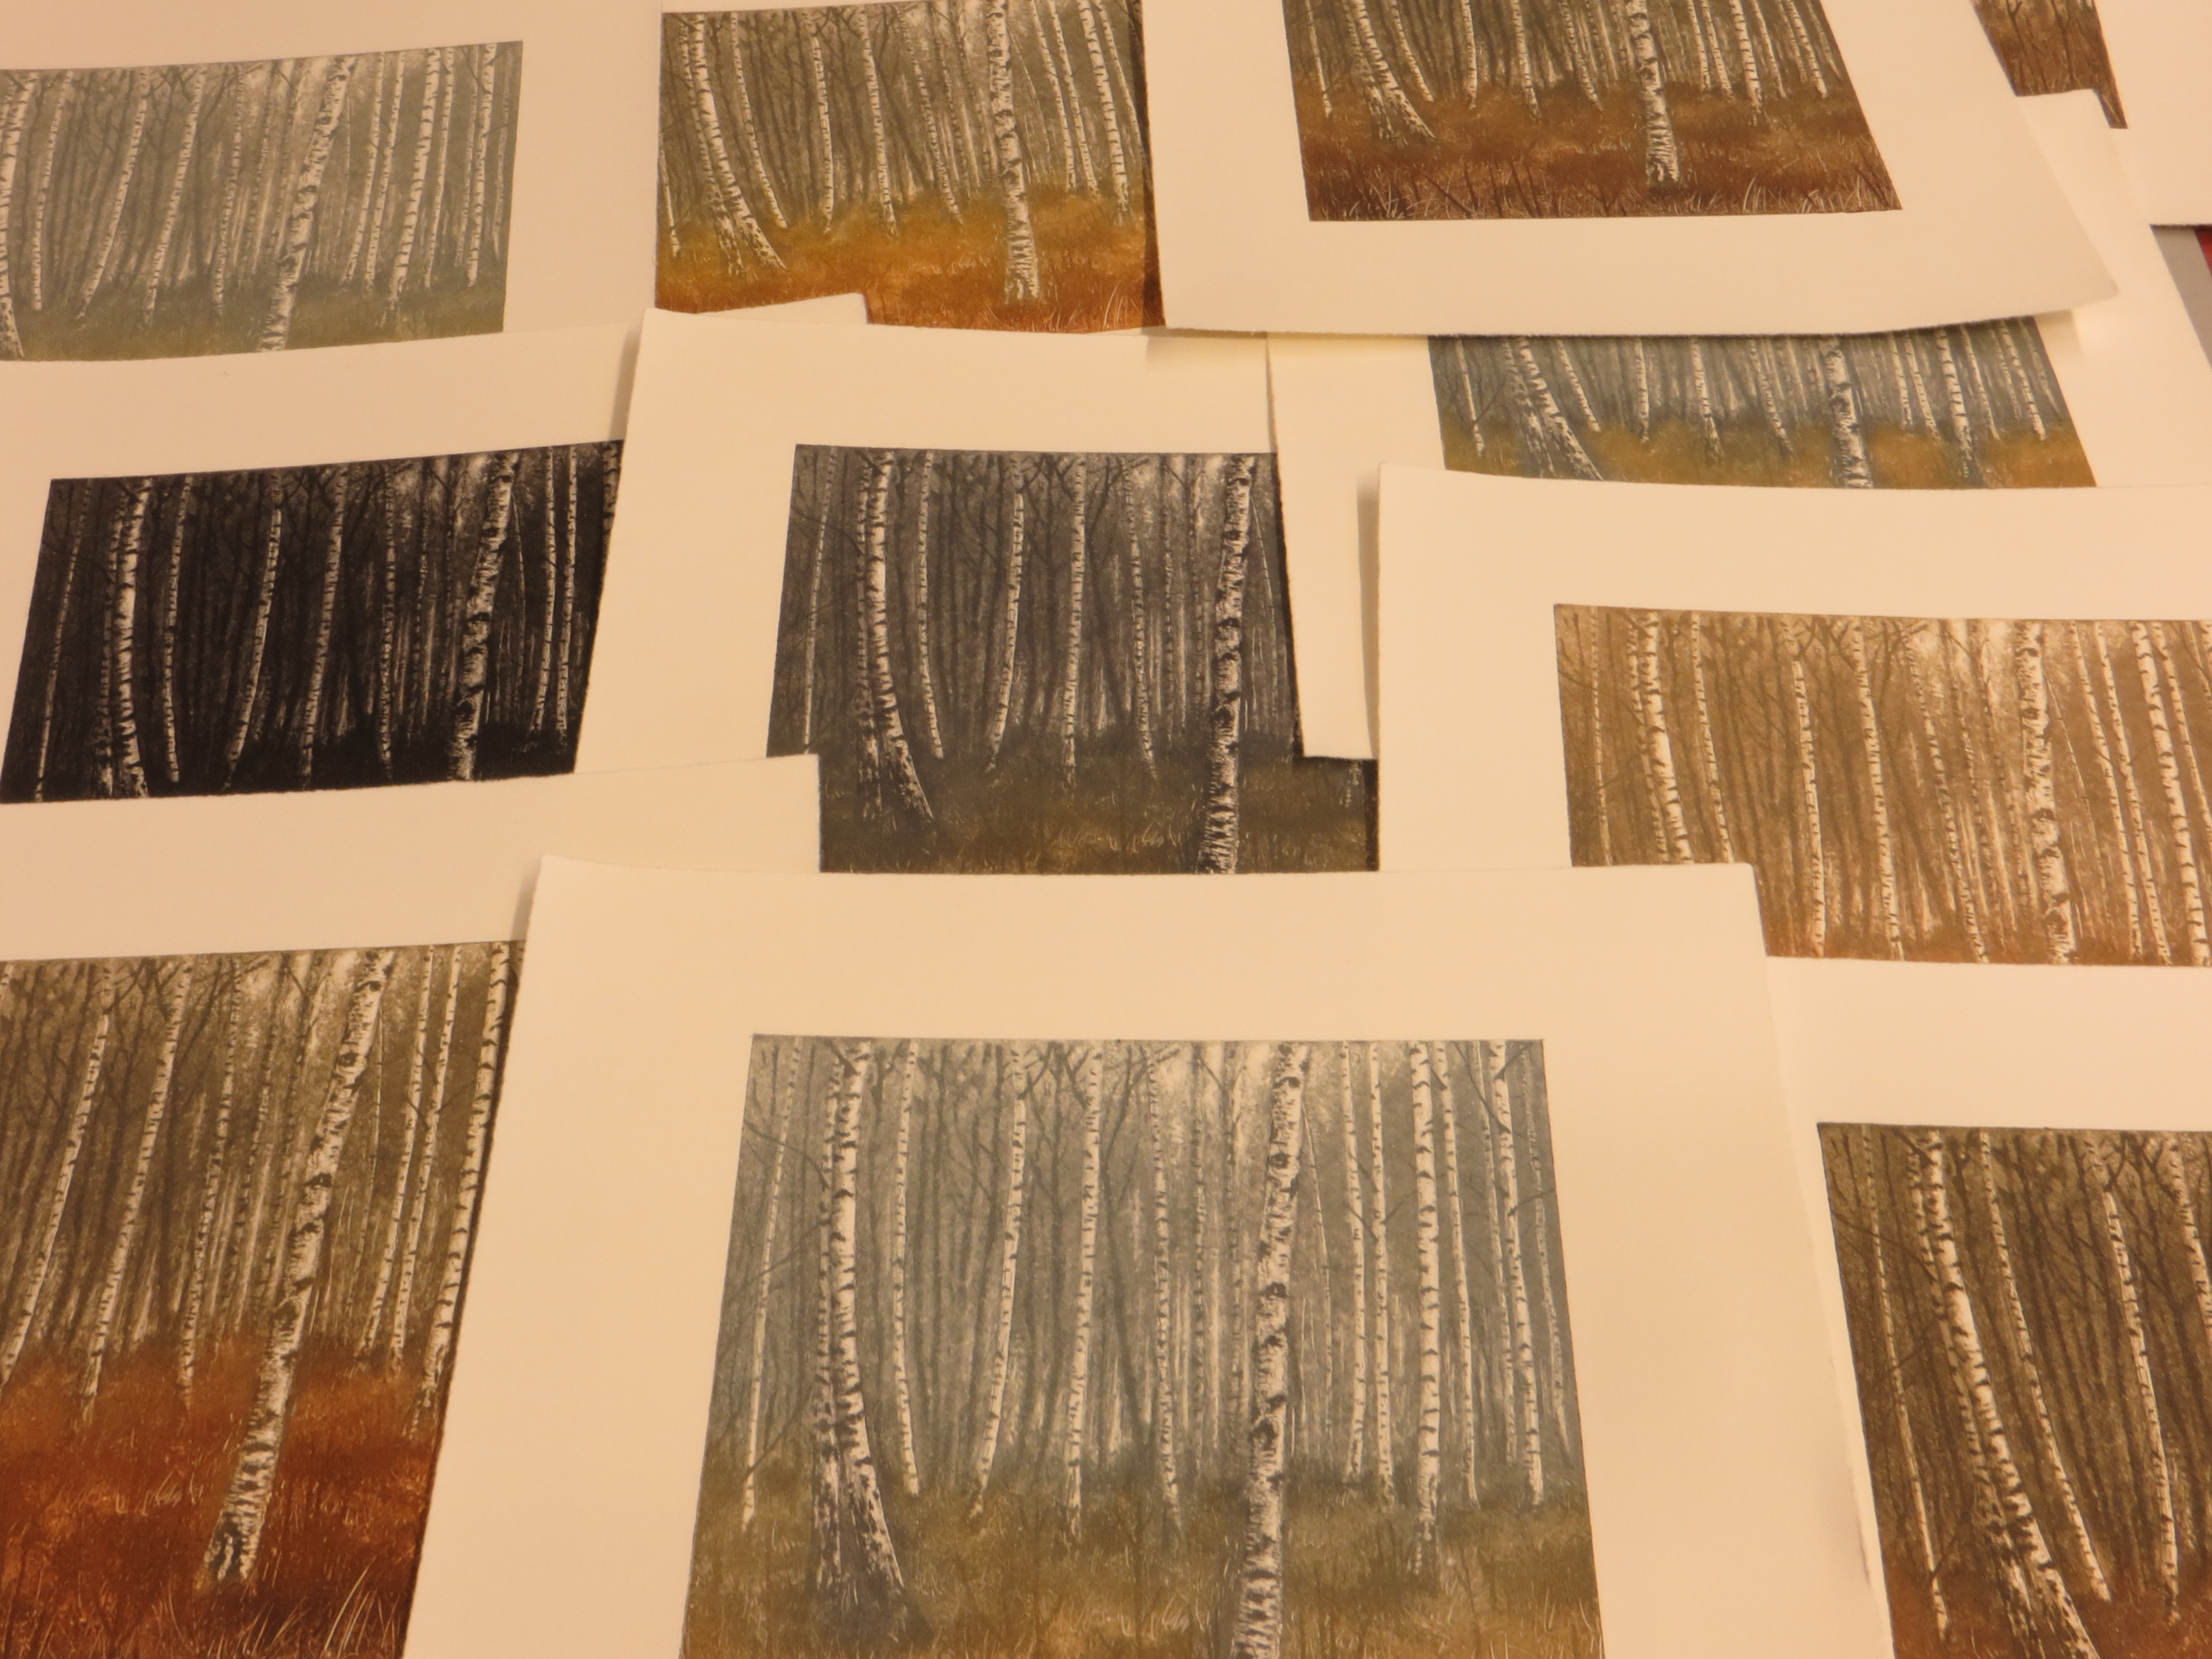
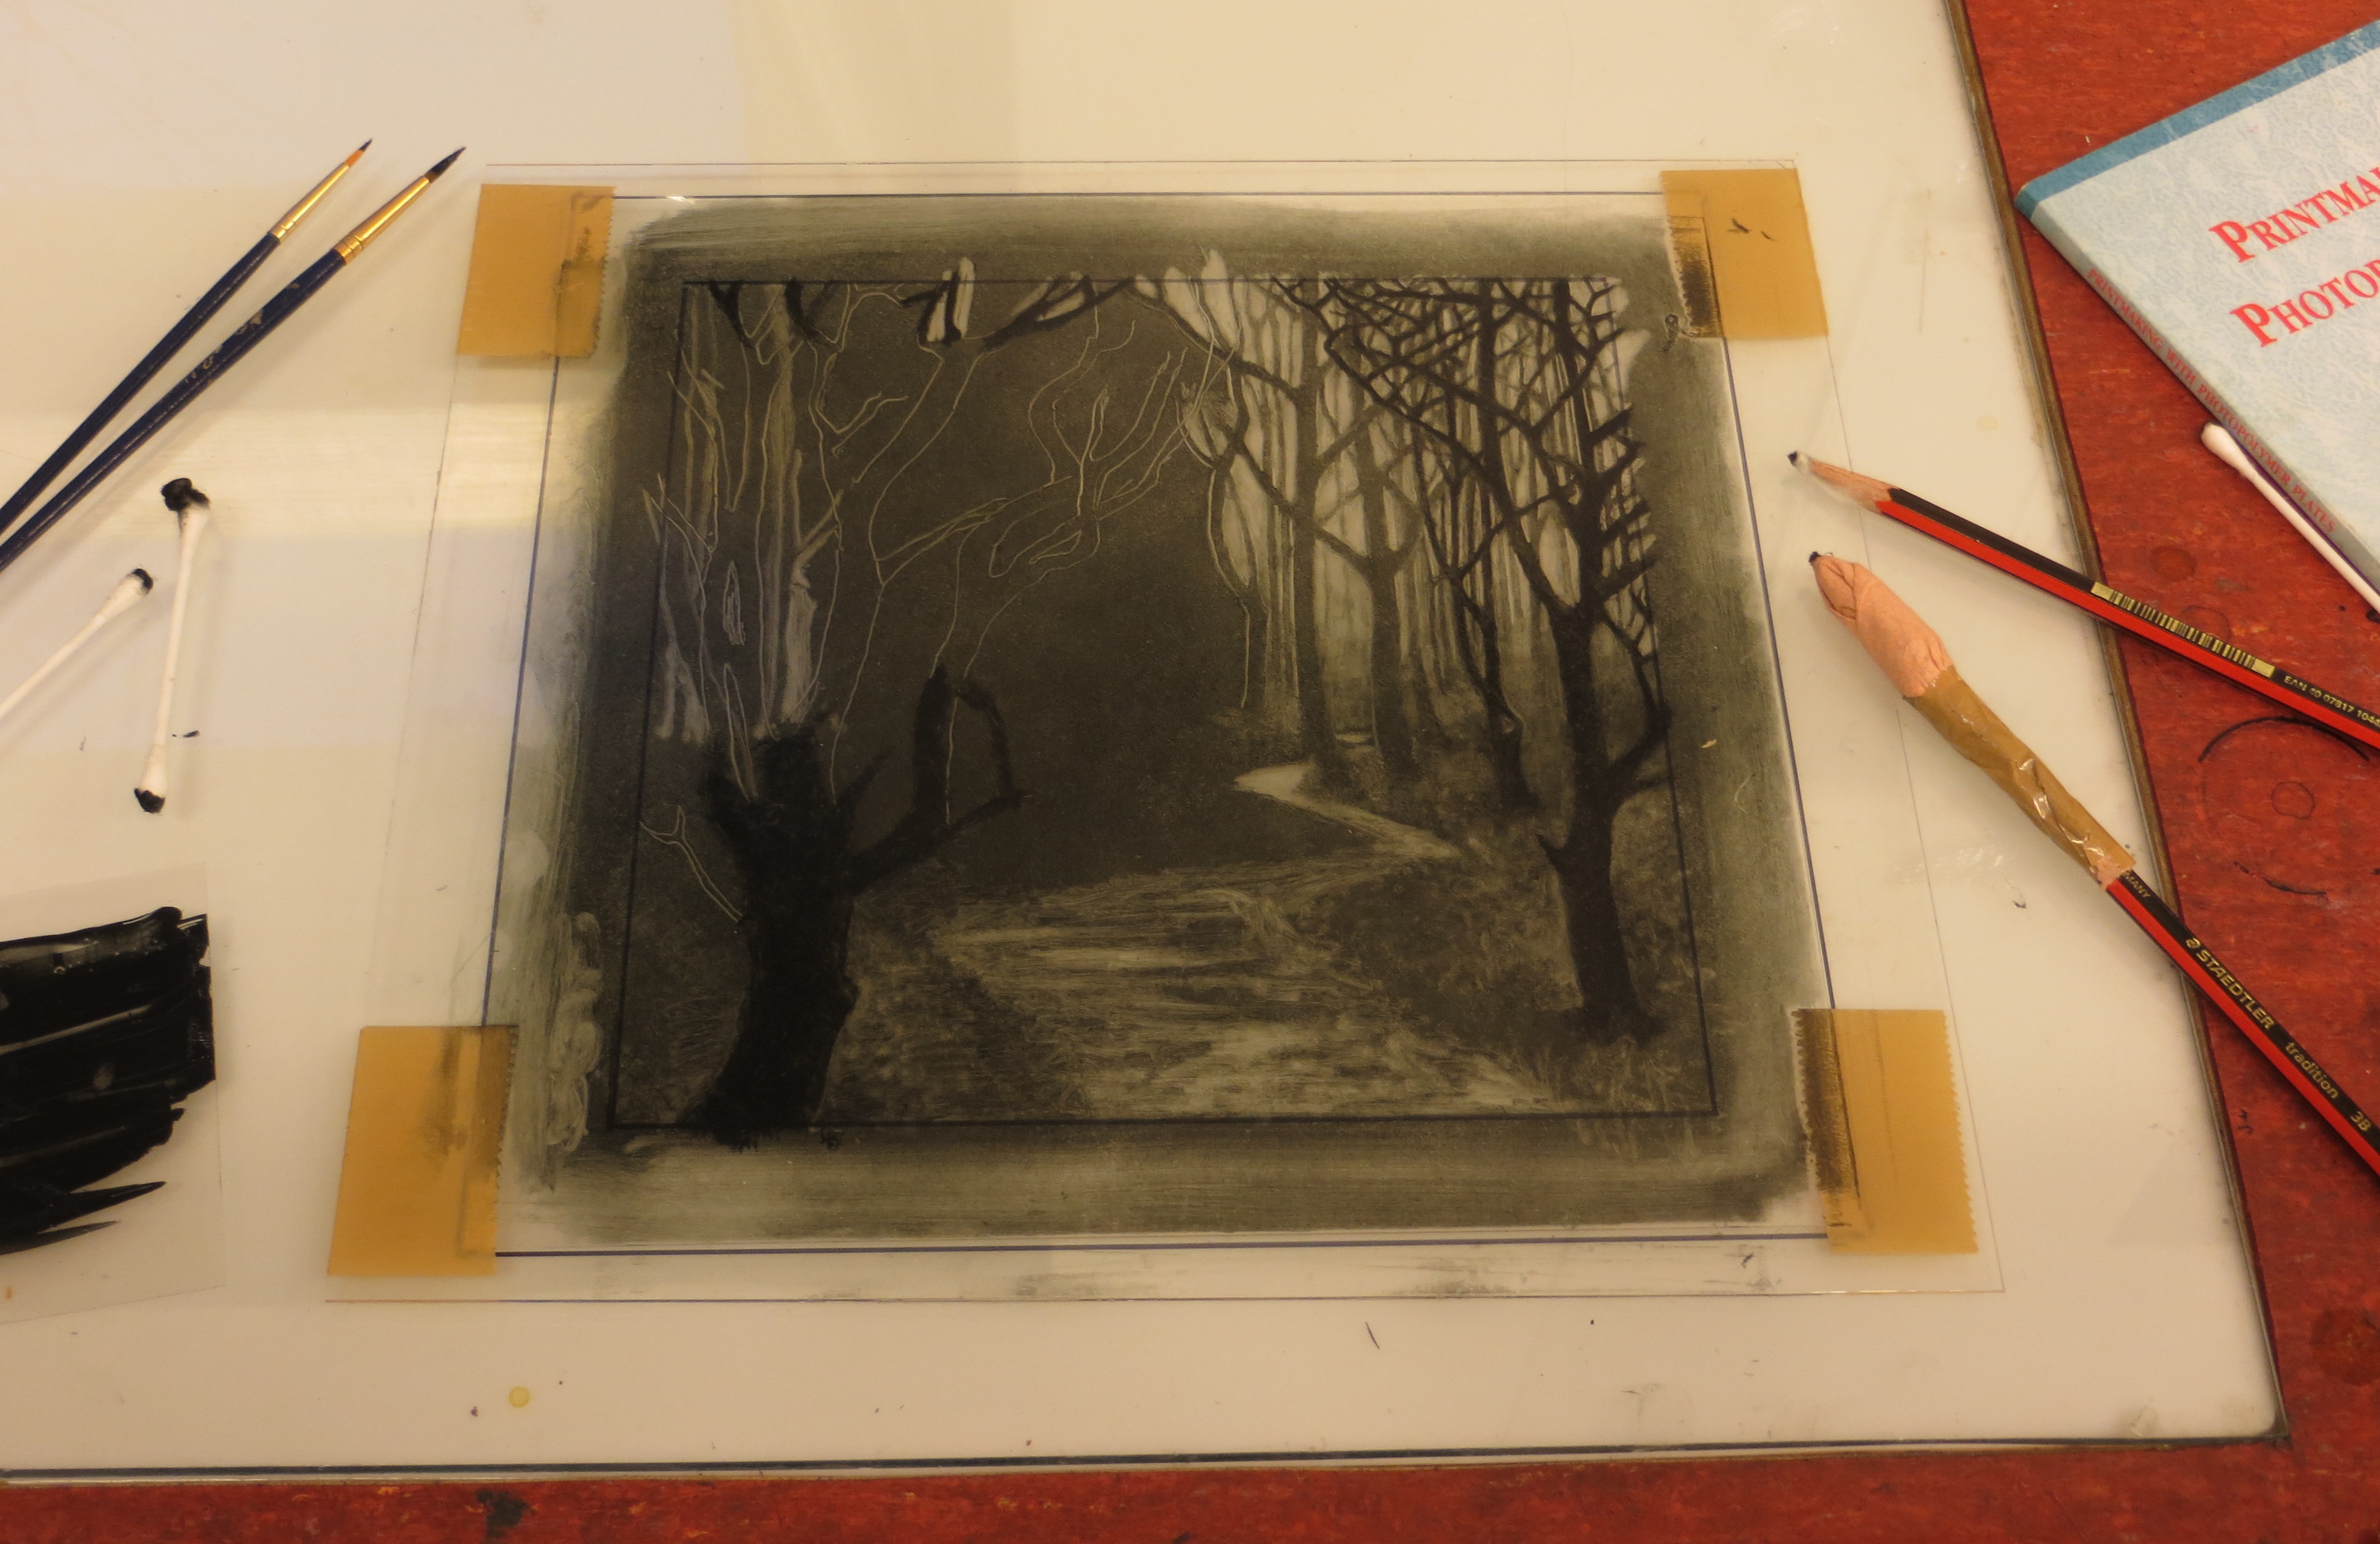
The first pieces to be made were based on a very foggy run that I went on with my partner and our dog. We parked at Sutton Under Whitestonecliff and ran to Gormire, up through Garbutt wood and onto Sutton Bank, along past the Glider club and down via the white horse, through the plantation to Hood Hill and back via Sutton bank and Gormire. Doing a large figure of 8. The ethereal woods and soft focus views triggered off a series of photopolymer prints developed when I was over at Algarden Printmaking Studio in Sweden. For more details, see my previous blog posts Seeing the Wood for the Trees & Photopolymer Experiments Continued….This is a small triptych that evolved:triptychI also spent months designing and cutting a collagraph plate inspired by the birch copse at the base of White Horse bank and of roe deer that I saw in the area. The birch forest was not too much of a problem as I had had previous success with creating a collagraph plate of one last year but I wanted a small group of deer and the grouping, positions and sizes (not to mention direction) took a lot of fiddling about in order to get it just right. The way that I work is that I’ll sketch out the forest and then I’ll sketch various deer in different positions and then trace them off onto pieces of paper that I can move around on the forest drawing. I’ll photograph all of the combinations so that I can compare them on my laptop and then I use photoshop to flip them to see what the plate will look like when printed (collagraphs print in reverse).

001

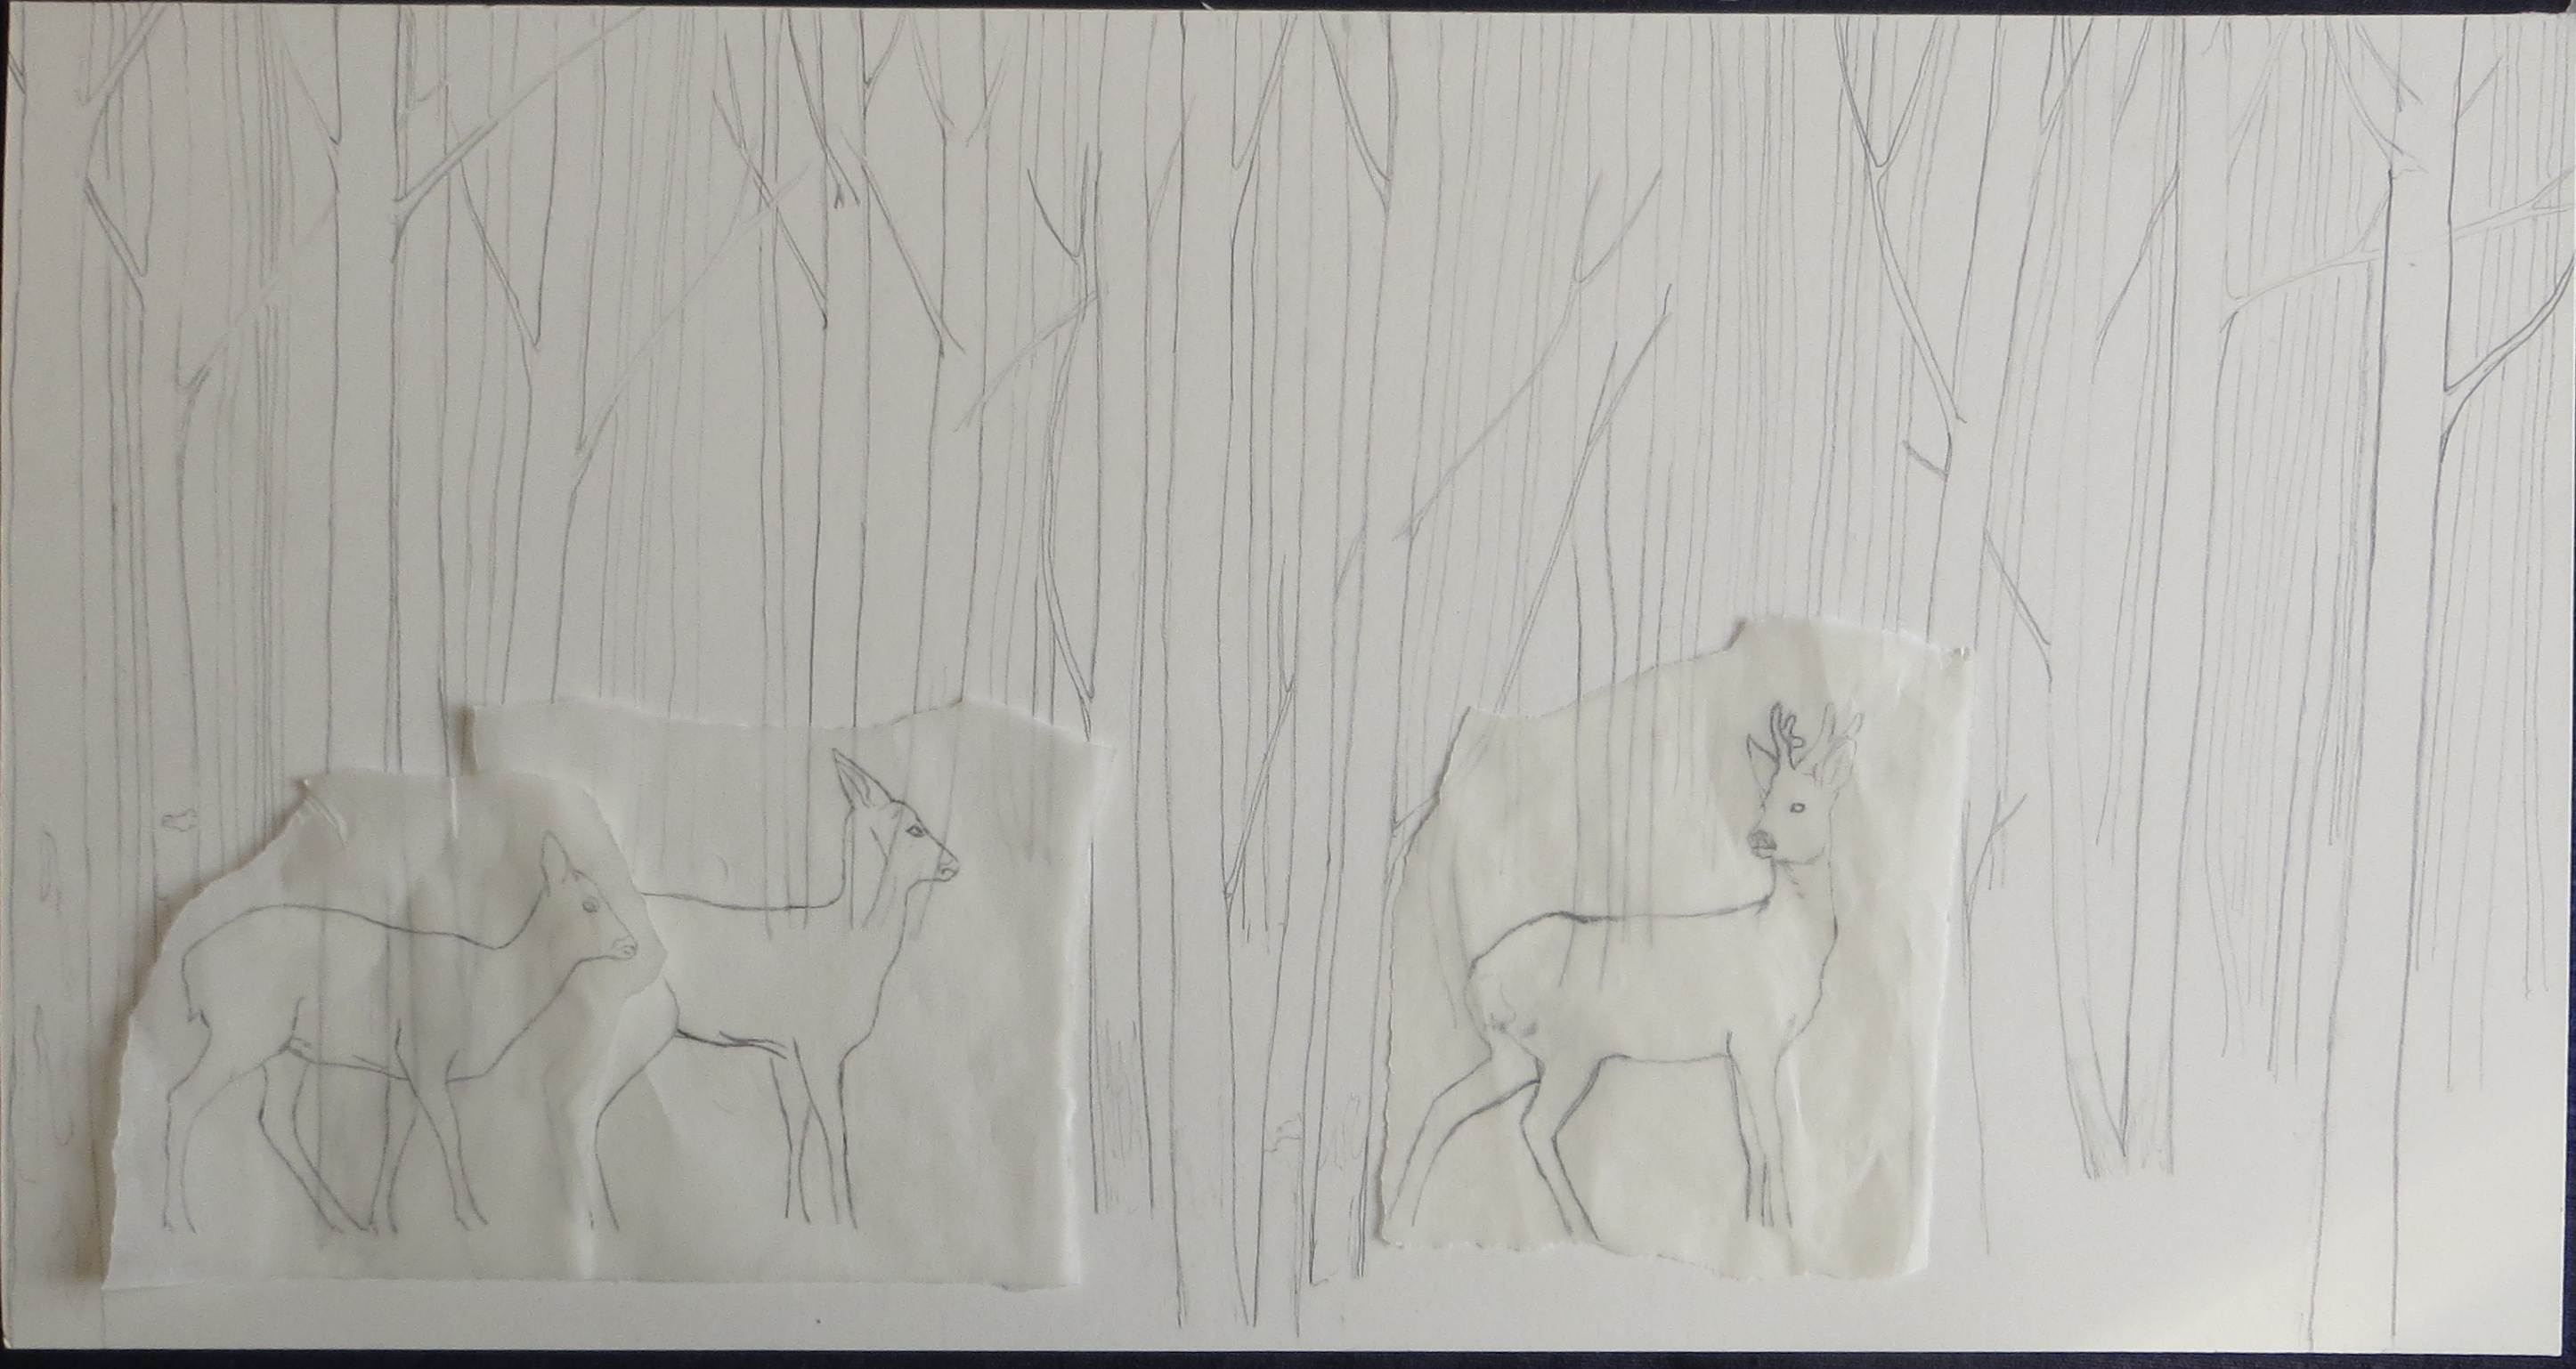
This is just one example of many attempts. Working like this also helps me to spot flaws in my design such as wonky trees, dodgy perspective and badly drawn anatomy! I ended up completing the drawings in Sweden but then decided not to make the plate until I returned home as it is such a time-consuming process and I wanted to spend the studio time developing my photopolymer work. The final piece was proofed in March.

Passing Through
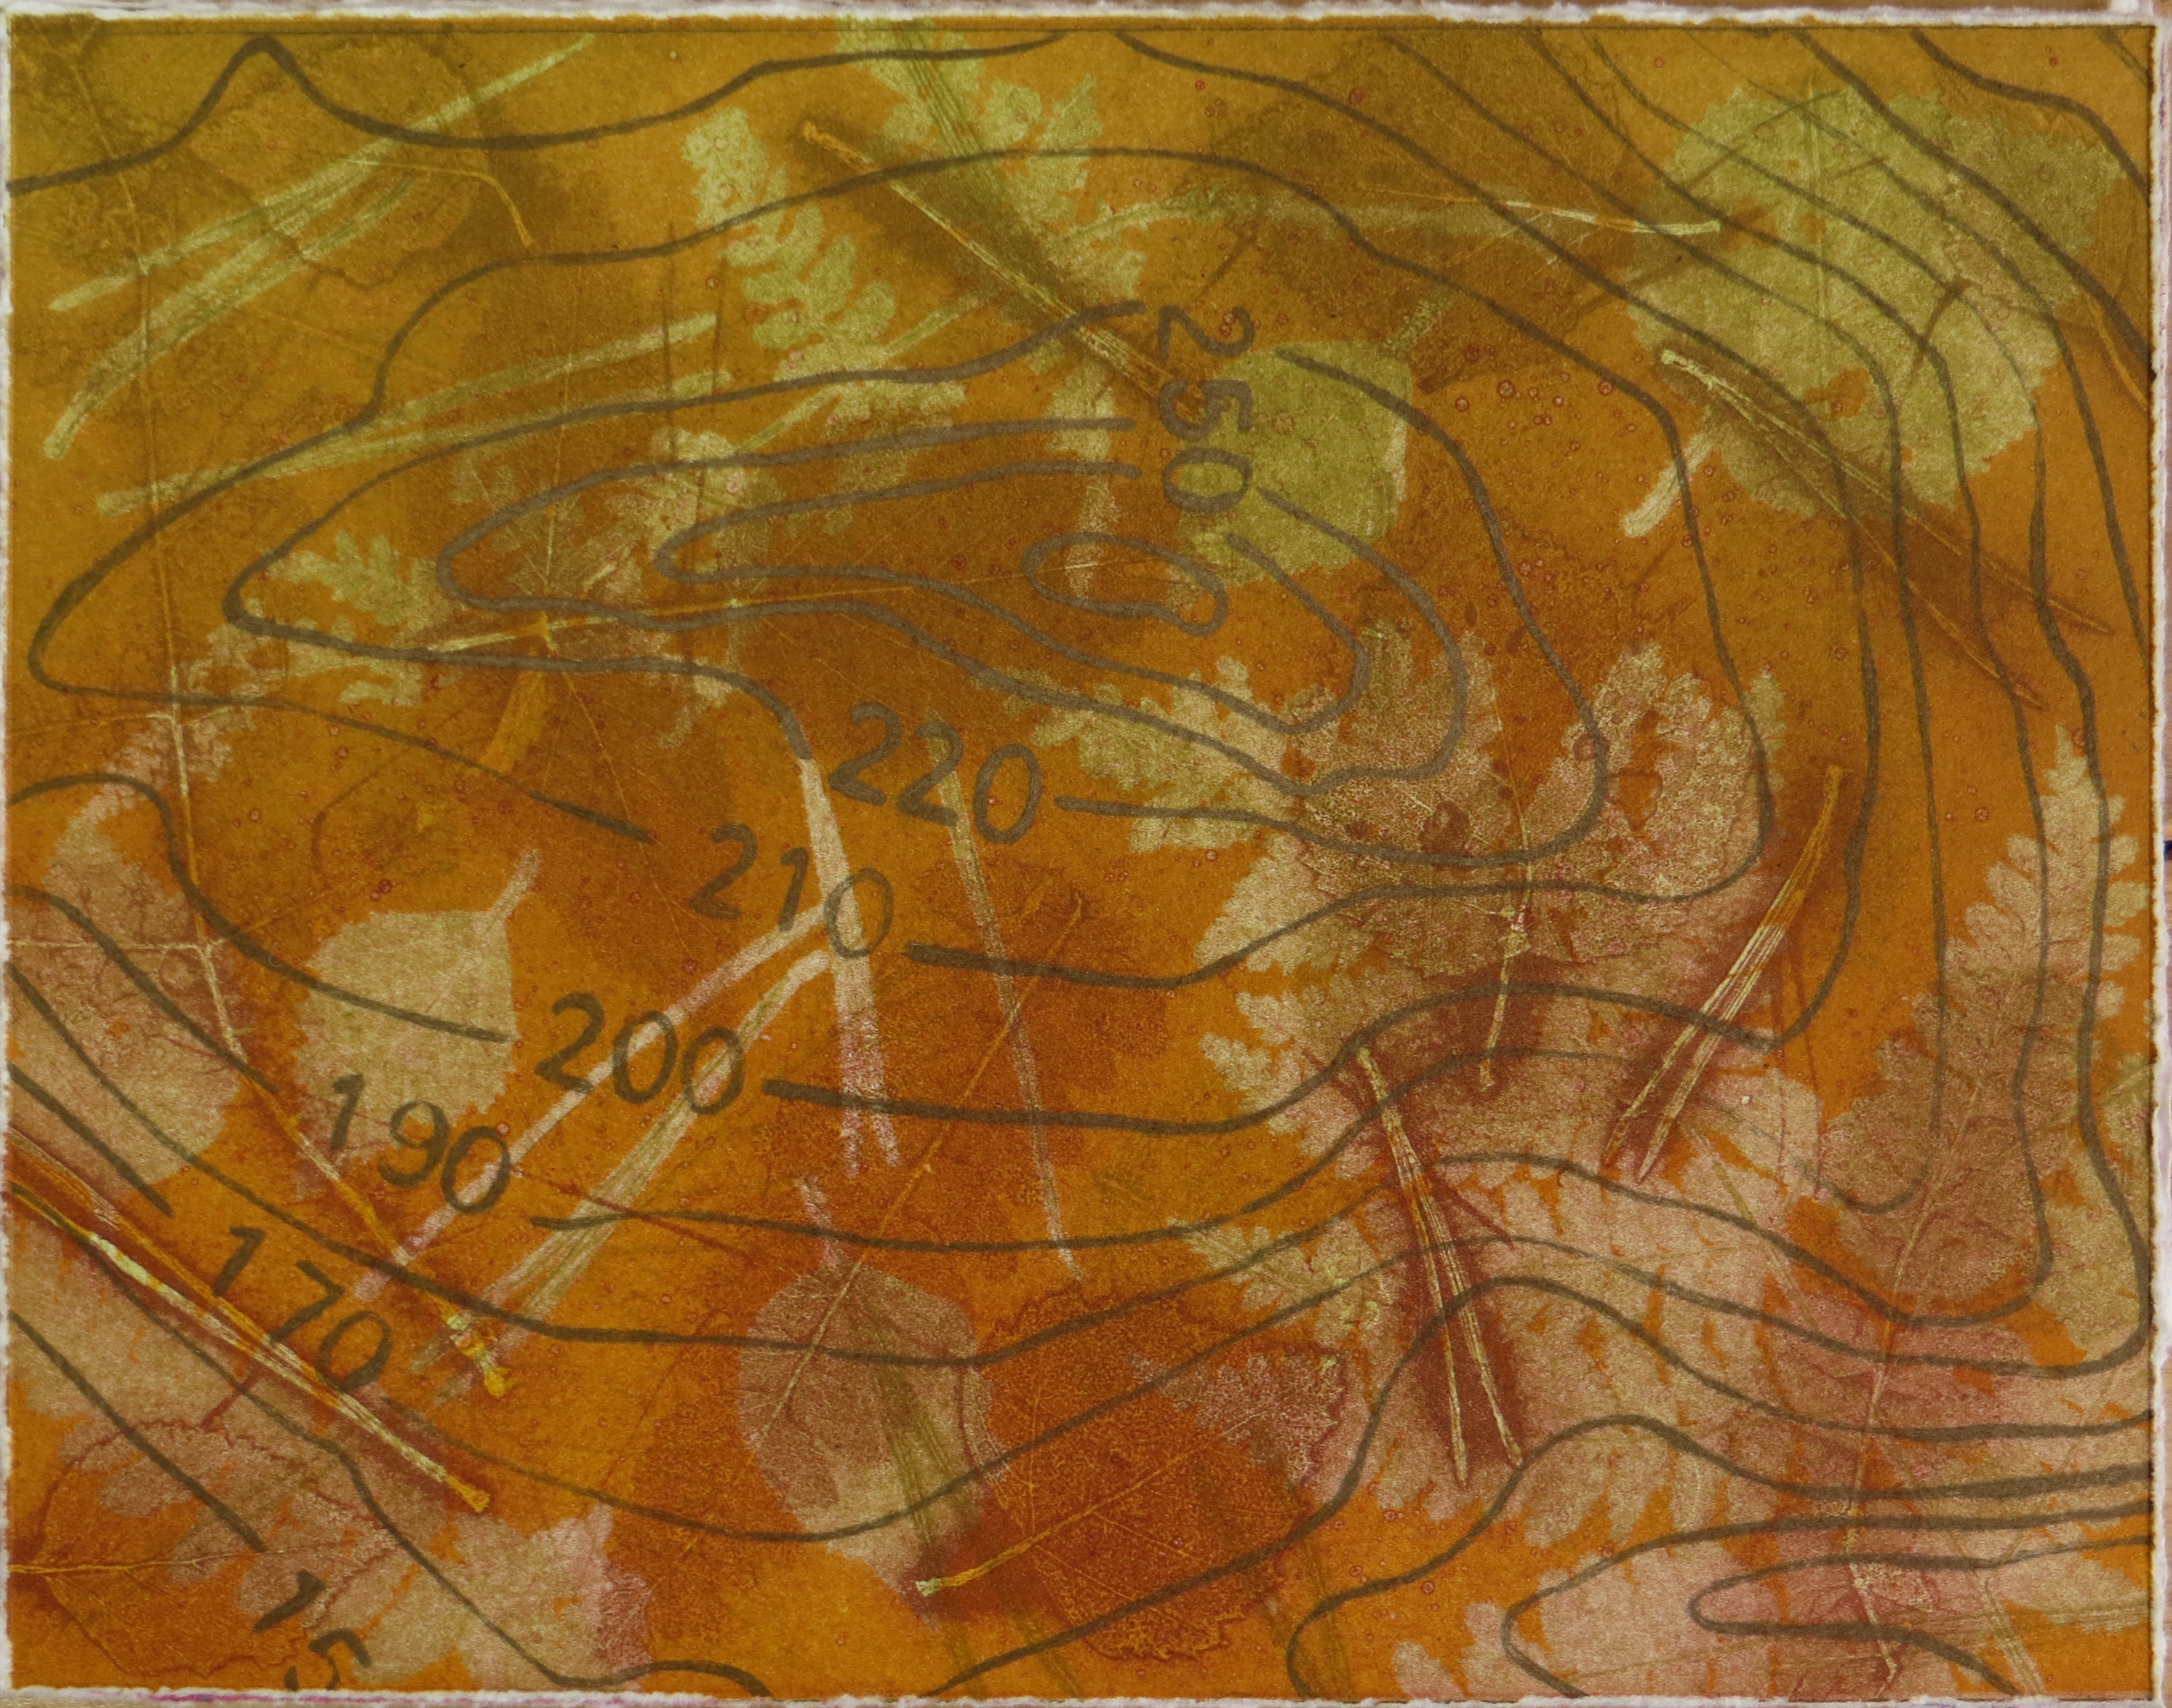
One of the key things about the project was that I was revisiting some of my favourite running routes and I wanted to allude to that in the imagery. Three places that I went to numerous times had quite different flora and topography and I decided that I could use this to make a series of prints. I set aside extra time on one of my visits with Paul Harris (who filmed me throughout the year) so that I could collect plant material from three of the sites. When I got back to the studio, I carefully pressed the different leaves and flowers in the pages of a phone directory and left them for a few weeks to dry. In the meantime, I studied an OS map of the areas and drew out the contours for the hills from where I’d collected the plants. Scratching into pieces of plastic, I created drypoints of the contours.

Over the course of a couple days, I printed the plant matter by rolling ink onto a piece of perspex that was the same size as the drypoints and by laying the plants onto the ink and putting them through the press. When I removed the plants, they left their impressions in the ink and I then printed that onto paper. I did this over and over again, changing the colours and tones of the ink and over printing the plant impressions until I had built up a number of images. I then inked up the drypoint plates and printed them as the last layer of each print. Whilst they were drying, I chose the best two sets of prints from the many variations. I painted blocks of MDF and pasted my chosen prints to the blocks using ph neutral bookbinding paste. The blocks were mounted within white box frames and hung as a series.

IMG_3818Gormire Lake:

007Hood Hill:

008Hawnby Hill:

010
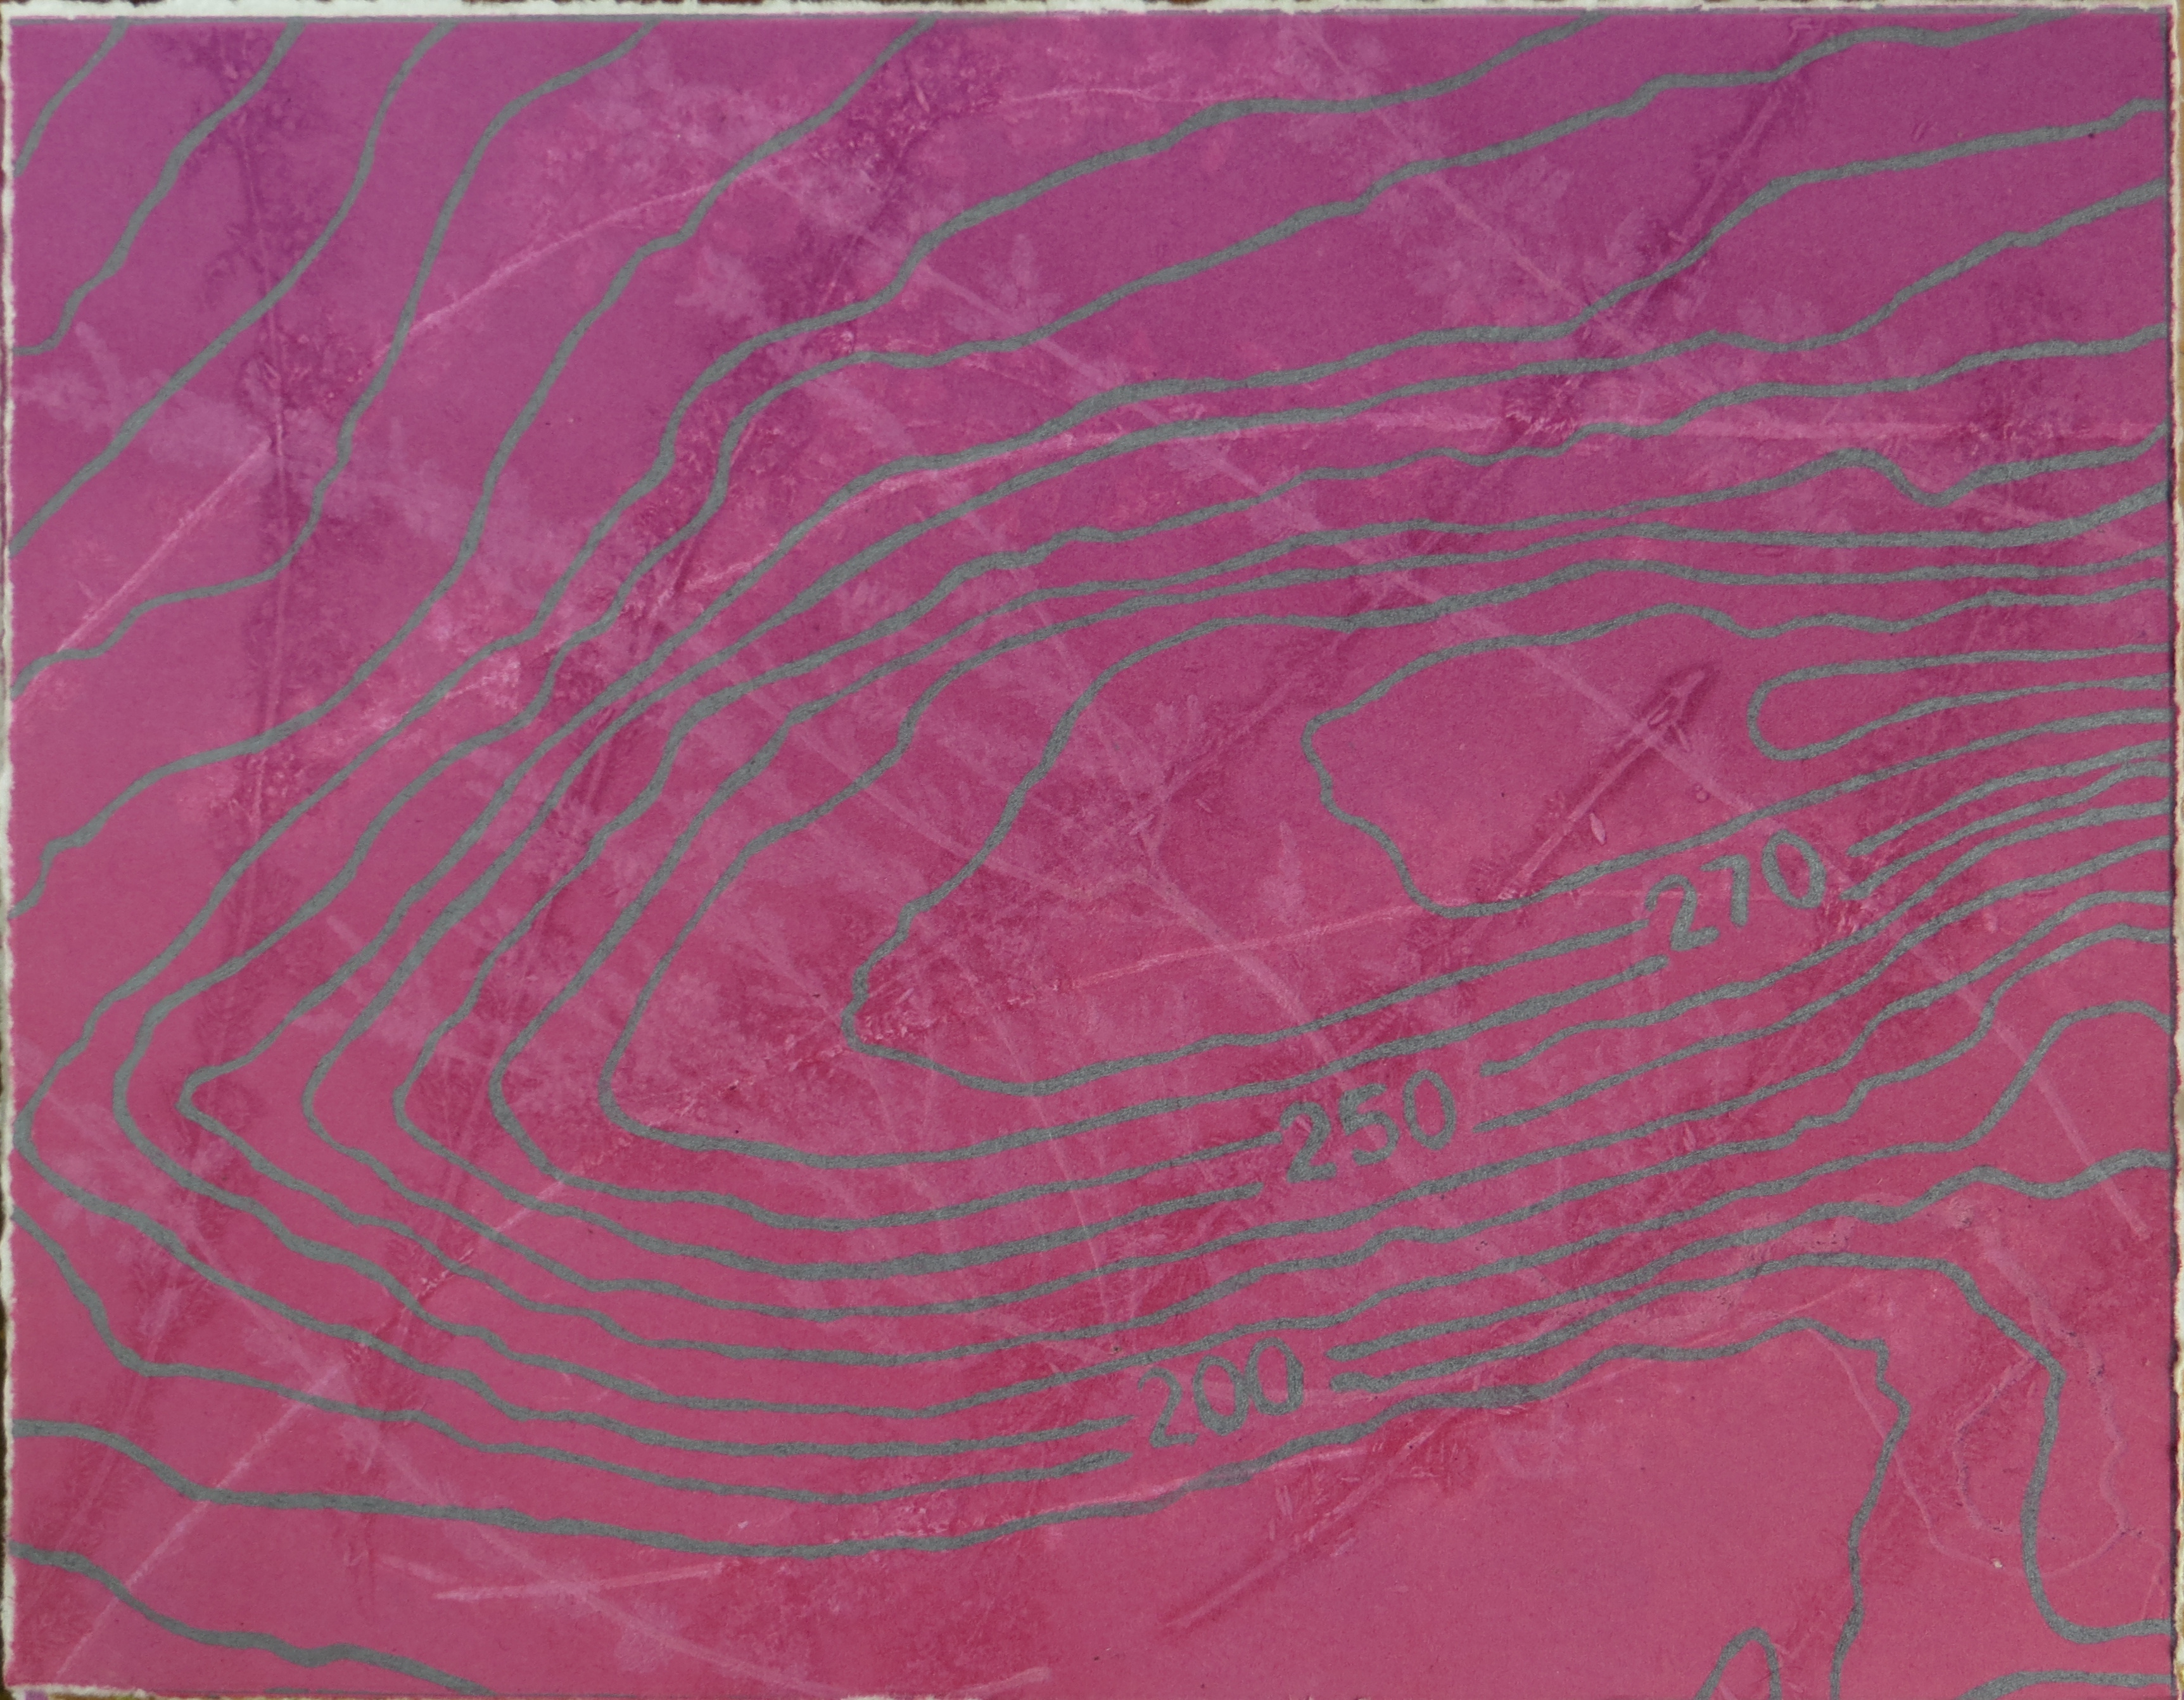
I’m using colours that reflect the incredible heather moorland at Hawnby for the last of these three prints. Not colours that I normally use but ones that found their way into another of my prints for the exhibition.

The Winter Lake
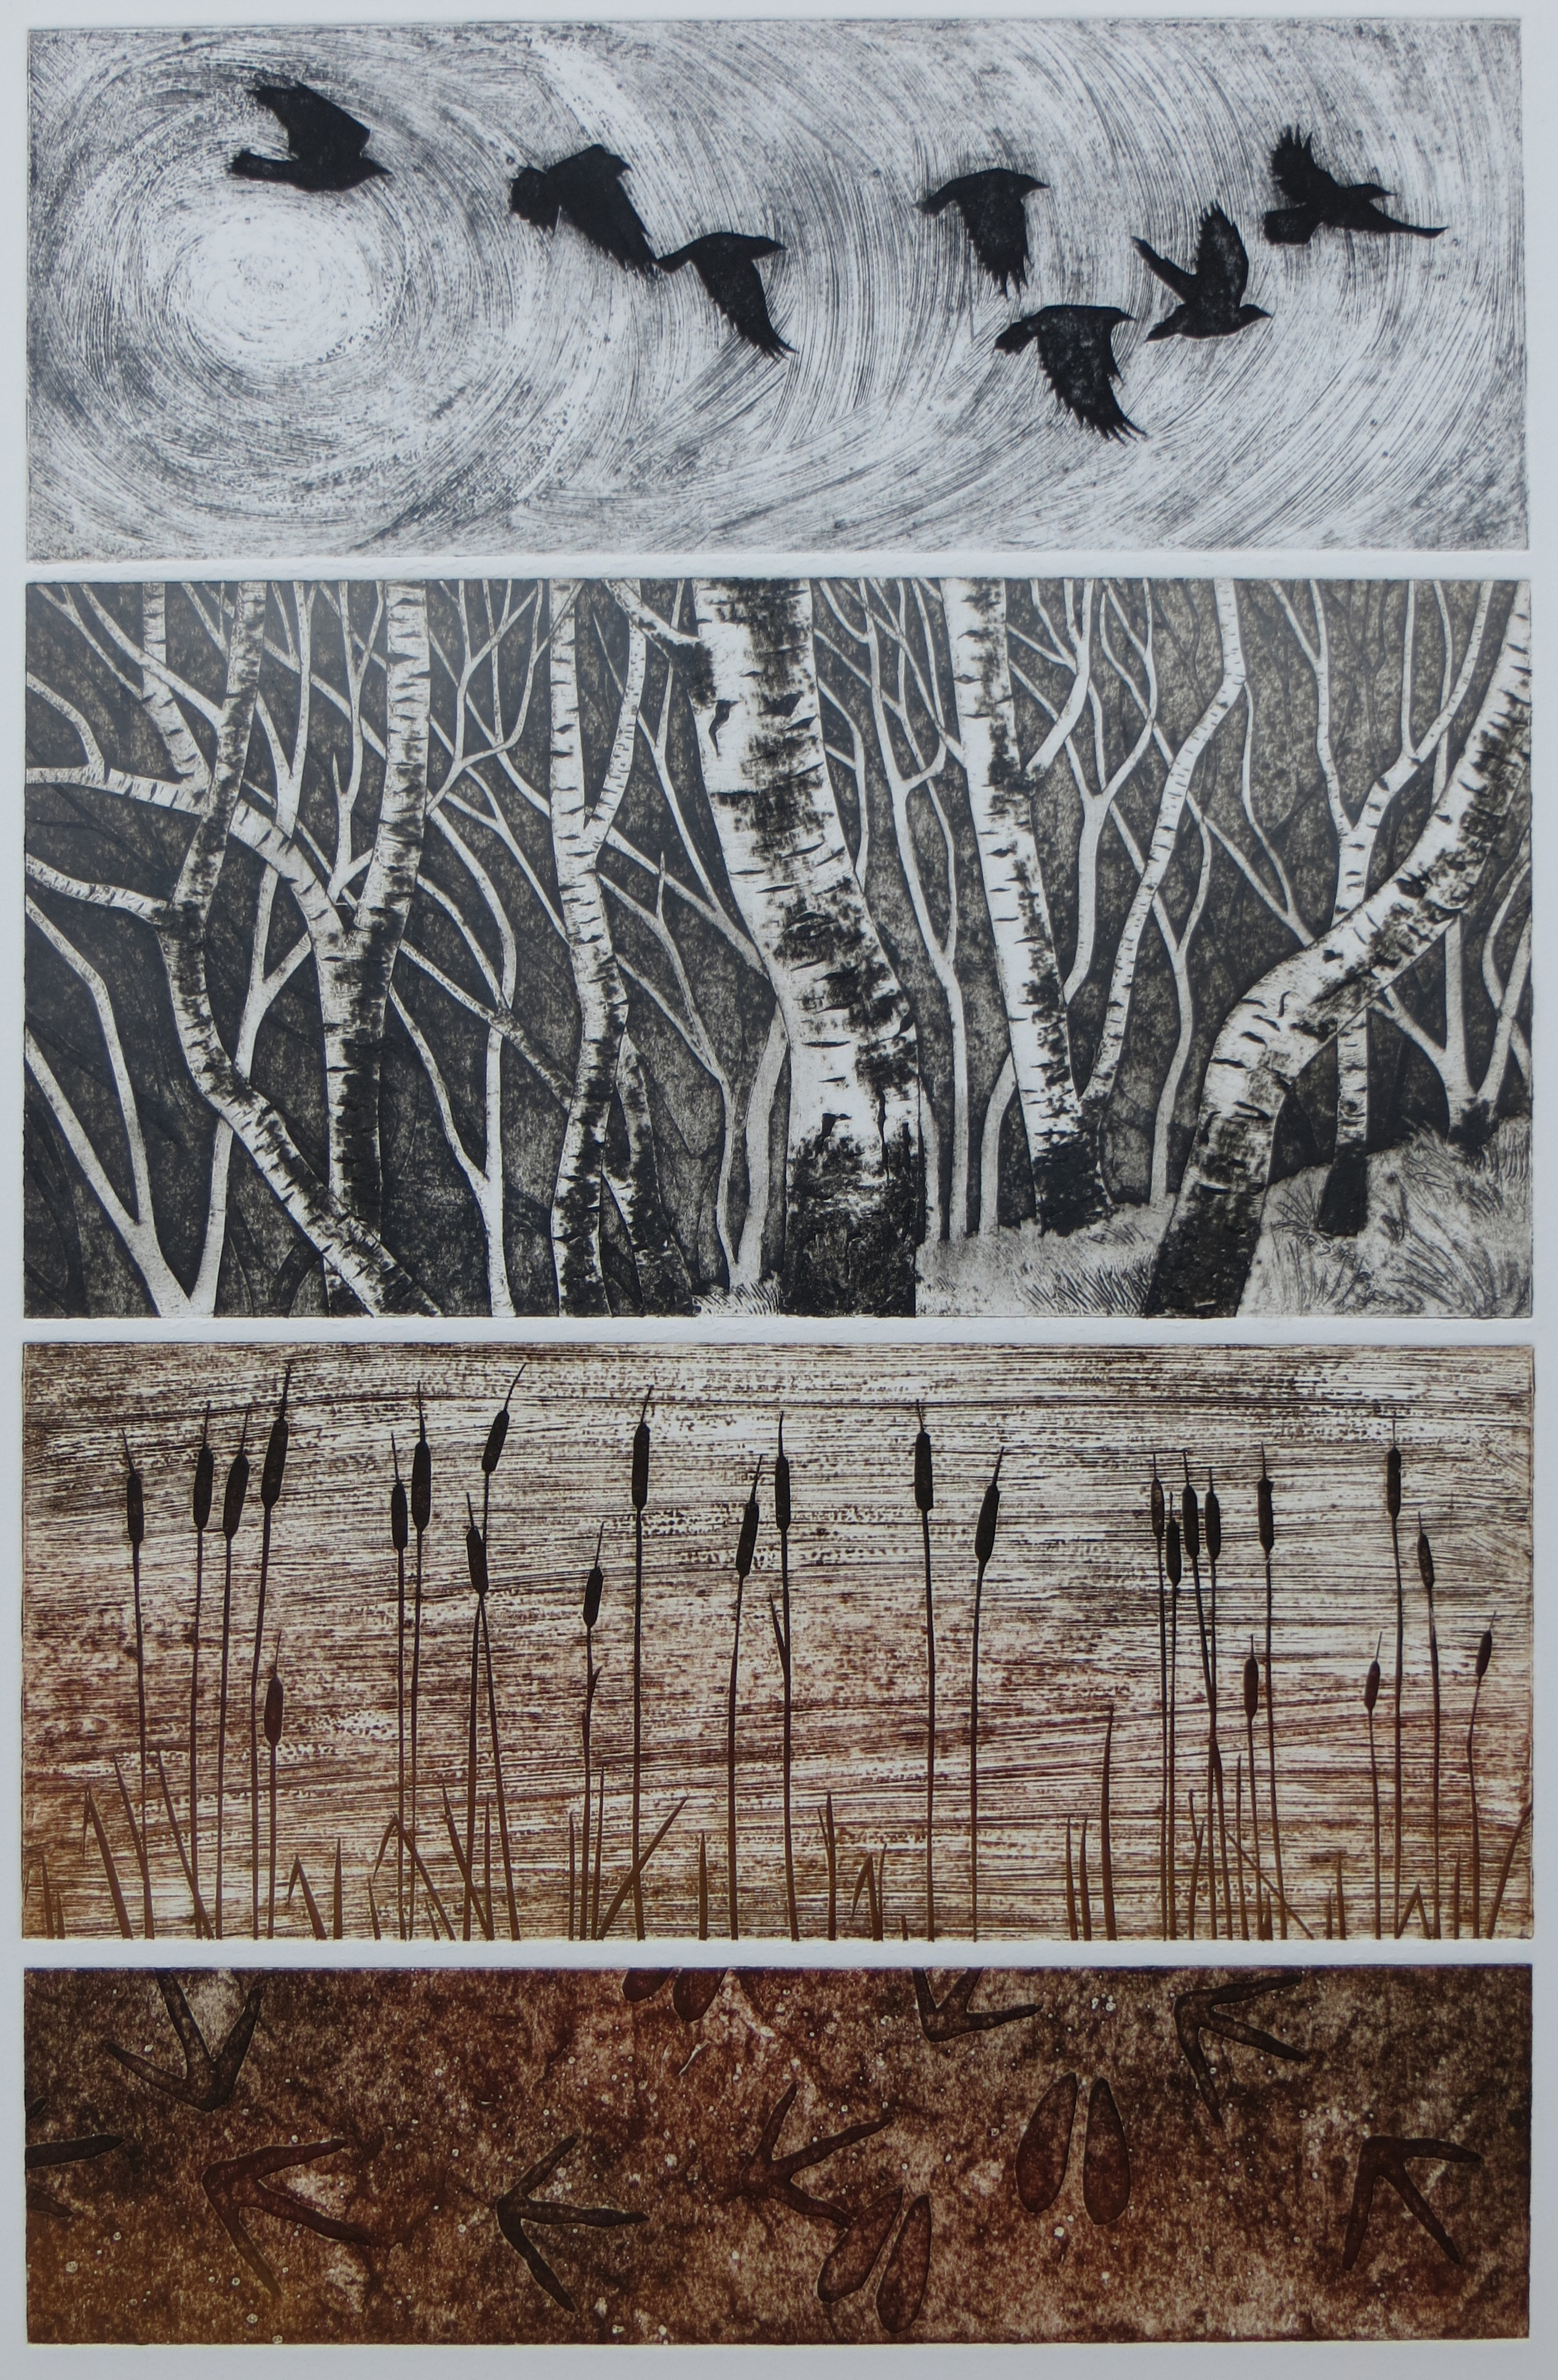
The Winter Lake was inspired by the view from the Cleveland Way above Whitestone Cliff. I often heard and saw flocks of jackdaws coming into roost on the cliff face above the lake and during the winter months, the birch trees around the lake were leafless but the twigs created a beautiful purple shade. The lake itself is very distinctive in shape and I couldn’t finish my work without creating at least one view of it.

There are many more prints on display including collagraphs inspired by some of the birds that I observed such as wrens, yellowhammers and skylarks but the last two pieces that I’ll include here are ‘layer collagraphs’. They are created by printing four separate collagraph plates with the aim that they will reflect the details of specific places. Textures, patterns and cross sections that I hope will give an impression of Gormire and White Horse Bank during winter and summer:

summer Winter

I have really enjoyed the year spent researching, visiting the places and creating new prints. I’ve also had a really interesting insight into film-making because photographer Paul Harris has been coming out on location, filming me at ArtisOn, visiting my studio and watching whilst I make some of the work and he has created a really beautiful piece of film as a profile of my work and life as a printmaker. Please do watch it if you can, I think it reflects the whole process very well and the film work is stunning: Hester Cox – Profile of a Printmaker by Paul Harris.


Last Evening at Ålgården

It the final evening of my stay at Ålgården and it has been a really good three weeks. I’m just trying to work out the logistics of getting all of my prints, printing plates and associated materials into my case so that I don’t get charged excess baggage! Fortunately I was working on relatively small-scale work and the very large birch tree was just a proof so I’ve torn the margins off so that I can keep it for reference. It does make me wonder how I’ll manage when I next come because I’d like to do some large-scale pieces here some time but I’ll cross that bridge when I come to it!

The final tally of works made is 7 new photopolymer prints (roughly 21x21cm each) and 2 small ones (although I’m hoping to get another made tonight) plus a large collagraph/drypoint, 3 x monotypes and a large collagrah designed and drawn up ready to cut. Pretty productive I reckon 🙂 I’ve also found time to run every day, go to Gothenburg for some exhibitions and have a couple trips out with my Swedish friends here. They have included a concert, an exhibition opening, trips to meet other artists in their studios, lunches at friends’ houses, a visit to Rydal Textile Museum and plenty of time in the woods.This weekend it was the opening of Bengt Johansson’s exhibition and he and his wife came to stay for a few days which was good fun. I’ve thoroughly enjoyed myself and feel very at home here.

003

(Bengt at his preview)

I feel like I’ve managed to make headway with the work that I began in 2012 and the photopolymer prints have given me a strand to my printmaking that fulfils something I feel has been missing. For a few years I have wanted to depict some of the atmosphere of the landscape in different weather conditions and have found it exceptionally hard to do with my collagraphs. By using my monotype techniques, plus some latent painting skills, I’ve been able to begin to depict some ideas that I’ve had for ages. Here is one of a pine forest:

023

I have ideas from almost ten years ago which I’ve attempted to recreate in print but that haven’t worked and now I can see a way to make them happen. I will be digging out some old sketchbooks when I get back.

It has been very damp underfoot in the forests here (and at home!) and I’ve been seeing the most wonderful reflections of trees in the puddles. The land is quite marshy in places too. My last few photopolymers were inspired by this. I started with one design and then decided to create three on the same theme. Here is a photo of the triptych of transparencies as I was creating them. The two on the wall are drying.

009

On Friday evening I was just heading to bed and I checked them to see if they were dry and they were. I felt compelled to get on and develop them and so I stayed up until 1.30am and made the plates. I then noticed that some of the drying prints of the photopolymer birch forest design were buckling so I decided to resoak them…big mistake! I hadn’t realised that the inks were water soluble because I couldn’t read the Swedish on the tins. I walked off to do something and when I came back to them, the prints were a vivid mess of running orange ink! It was pretty disheartening as they were the two that I was the most pleased with but these things happen and I’ll be reproofing in the UK with my inks so it doesn’t matter too much. Here is the pile of prints that didn’t make the grade!

097

Anyway, lessons learned and the good news was that the sun was shining brightly the following day and the photopolymer plates were curing nicely in the studio windows all ready for me to proof on Saturday.

PicMonkey Collage2

I love the rich contrast that you can get with this kind of printmaking and making the transparencies is very satisfying. I roll the ink on to the acetate and then create the image by wiping it away and it feels like painting the light back into the image. Right, I really do want to get a third indian ink transparency made and developed on a plate so that I have a North York Moors triptych for my project so I’ll sign off for tonight but, whilst I’m sorry to be leaving, I’m feeling pretty positive about my printmaking and I’ll be coming back here again soon.


Photopolymer Experiments continued…

Well, it has been such a good week here at Ålgården. I’m feeling very happy and creative despite fatigue setting in from late nights working and morning runs. There is so much to say but I’m going to stick to photopolymer updates in this post. Last time I wrote I had been practising my reduction monotypes on paper and then I went on to do one onto acetate to act as a transparency for a photopolymer plate.

012

It was something of a labour of love to get it finished and by the time that I did, the ink was beginning to dry but it still took the weekend for it to be totally dry enough for exposure on the plate. On Monday morning Kristina Thun talked me through the various steps again because I was slightly unsure of the settings for the exposure unit and then I went about exposing the plate and developing it in water. It was very exciting to see the image appearing as I gently brushed it in the water tray.

I was impatient to print it but didn’t want to spoil the plate by rushing so I forced myself to work on one of my collagraphs whilst the photopolymer hardened in the light from the window.

My first proof was done using black charbonnel etching ink on Hahnmule paper and it worked fine although the result is darker than the final image will be because I have designed it to be printed in a soft ‘foggy’ grey.

013

Since I proofed this print, I have spent another day working on a further acetate with the intention of this one being printed using graduated colours.

046

I’ve been cutting my 30x40cm photopolymer plate up to create two plates that are 20.5 x 20.5cm and have been left with a longish strip of plate. Photopolymer is expensive stuff and I’m not letting any go to waste so I’ve divided the strip into four squares and am making little experiments using my textured acetates that I made in the lithography studio and tusch, Indian ink and other materials. I’ll try and do as many as I can so that I learn lots about the process and what results you can get whilst I have access to the equipment.

In between times I am working on two large collagraphs. Today I spent a good part of the day developing the second acetate and one of my experiments which is actually inspired by a view towards Hood Hill in North Yorkshire. I had a great printing session and proofed everything in black before mixing some colours up. That was quite a challenge as my Swedish is non-existant and there were many tins of ink so I had to look inside nearly all of them in order to find out what was on offer. I managed to mix a soft grey and a nice graduated ochre/umber.

048

I think that this will look better when printed on to a whiter paper but I’m pretty pleased with the result so far.

051

And here is the little sample using Indian ink.

054

My plan now is to make another 20.5 x 20.5cm acetate tomorrow and whilst that is drying, I’ll finish one of my collagraphs and carry on with the little experiments. I’m buzzing with ideas and am having to be strict with myself and sit down and work through them methodically or I am in danger of becoming a grasshopper and jumping about all over the place. I’m working in a totally different way to how I work at home. I normally work on one plate until it is finished, only breaking off to print up editions of existing prints if needed. Here I am working on four or five ideas and three different methods of printmaking at the same time. It feels great!

Seeing the Wood for the Trees

So far things have been ticking along very nicely at Ålgården. It is good to immediately feel at home this time around and I am very pleased to have been given my own key and have my membership confirmed. I’ve developed a nice routine of getting up early(ish), having breakfast and then heading into the woods for a run. This sets me up nicely for working in the studio all day and into the evening. It is an opportunity to clear my head and focus on what I want to achieve each day and also helps me feel inspired. On Thursday we had snow and so I lengthened my route a bit to get up high on the crags where it was thicker.

034 042

I was really pleased to see a hare in the path ahead of me and was able to watch it for a while before I disturbed it and I also saw fox tracks. Today I saw a pair of roe deer bouncing across the path and into the forest, they stopped to have a look at me!

Anyway, back to printmaking! One of my main goals is to try and develop my photopolymer printmaking. On the final days of my residency in 2012, I explored making transparencies using my monotypes and left feeling excited about some of the results. I love collagraph printmaking, it is my preferred method of working, but sometimes I want to convey atmosphere in my prints that I can’t seem to do in collagraph. I want some of the mark-making and softness that I can create with monotype but I’d also like to be able to create editions and have the freedom to play with the image without it being a one-off. For my North York Moors prints, I have been really inspired by a foggy run around Gormire but how do you create the ghostly ethereal atmosphere in a printing plate?048

I’m not interested in making plates from my photographs because my printmaking is about how I interpret the world around me and my response to it and I prefer to design my images and simplify my ideas constructing a print that illustrates how I feel/think about my subject. I want people to look at a print and have an emotional response to it as opposed to a more detached aesthetic appreciation. My aim is to inspire a sense of recognition in the viewer. I find it so difficult to explain what I am trying to do with my printmaking because I often just work from my instincts and a drive to explore an idea or make something that I’ve seen fleetingly into a lasting image. I don’t tend to analyse my work which is why I find it so interesting to talk to people about their interpretation of what I do. This year it is one of my goals to give myself time to think about what I want to achieve with my work and what I’m trying to say.

I wrote all about photopolymer in a previous post (Adventures in Photopolymer) and so I won’t go into it in detail here but I’ve spent the last few days making reduction monotypes on paper in order to organise my ideas and work out the logistics of how to create a monotype transparency for making my photopolymer plate.

007

(two of my monoprints)

I also did a sneaky drypoint of the birches in snow on Thursday as I was a bit overexcited about the weather 😀 I then spent all day yesterday working on a piece of acetate creating a positive for developing onto a photopolymer plate on Monday. I started by rolling up the acetate in a very fine layer of black ink and then I dabbed that all over with a ball of tissue paper to soften and lighten it. I then removed ink using cotton buds, homemade implements such as a pencil with a bit of kitchen towel wrapped and taped to it to create a pointy wiping thing for fine detail and a variety of brushes. It was a painstaking process and I had to be very careful not to drop bits on it or get fingermarks in the ink. Every mark I made will hopefully be reproduced on the plate.

008

The ink is oil-based so it stayed workable all day although as midnight approached, it was become decidedly sticky! I also painted onto the plate to get darker areas in the foreground but I blotted them with my home-made ‘dolly’ to give them some texture. This is the first time in ages that I’ve done anything that has been so close to painting. It will be very interesting to see how it comes out. I’ve got to wait for the transparency to be totally dry before I develop it because I don’t want it to stick to the plate. This meant careful transportation from the studio to my room so that it would be safe from today’s life drawing class.

So, today was life drawing and I spent two hours discovering just how rusty my life drawing skills are. By the end I was just beginning to get whole drawings done during the allotted 5, 4 & 2 minute poses. It’s good discipline and really forces you to make quick decisions and to think about your drawing as a whole. Definitely something I should make the effort to do more often. Right, I’m off to the studio to do some work on a large collagraph that I brought from home. It is of a birch wood (surprise, surprise) with deer inspired by a forest that I saw near Gormire (where I also saw deer). It will be a slow process cutting and painting all the textures into the plate so I’ll have it on stand-by for when I am waiting during various stages of the photopolymer plate-making process or for when the studio is busy and I can’t concentrate very well.

Bookmaking: Part 2

Oh dear, I’m not awfully good at blogging. My main problem has been having to prioritise and the time I would have taken to write a post has been used for printing or urgent admin. It has been a really, really busy summer and I’ve been working pretty much every day and night apart from when I took two weeks off to go on holiday with Brian. We just jumped in the car and headed north to Scotland complete with Harry the wonderdog and our tentipi. With no plan but some good ideas, we visited Glencoe, the Isles of Skye, Harris and Lewis, Loch Ness and Fort William (for a quick scoot up Ben Nevis). We ran everyday, swam in the sea and visited artist friends in the Outer Hebrides. It was brilliant.

IMG_1667

I came back with lots of ideas for prints and feeling refreshed. I then had  time off with Mum on her recent visit. Both of those ‘time outs’ were just what I needed and I feel almost sane again 🙂

The upside of being so busy is that I am also selling lots of my prints and my work is reaching a wider audience which has led to some exciting invitations for exhibitions and some new galleries selling my work…more on that in a future post.

I promised that I’d show some of the other books that I’ve made as a result of Joan Newall’s excellent bookmaking course and as I am about to begin year 3, here they are.

This is a star book and is called ‘The Rookery Book’. It has a photopolymer print cover and the inside is cartridge paper with photopolymer and relief printing.

039


046

043


This book is a concertina book and is called ‘Seven for a Secret’. It is collagraphs printed on hahnmuhle paper with a monotyped cover and blind embossed text.

034


And finally, here is my favourite book of the trio, ‘As the Crow Flies’. It is a gallery book and has a monotyped cover with block prints on hand dyed paper inside plus the text is of haiku that I wrote about members of the crow family (jackdaws, rooks, crows etc) over the course of a year.

048


050


053


Well, I hope you liked the books. This year’s theme for our course is ‘inside’ and we are going to explore dying papers, bleaching, rusting and wax as well as pushing some of the book forms we’ve already learnt in new directions. I’m really looking forward to it.

Final Days at Ålgården

I started this post whilst I was still at Ålgården but I had so much to do before I left that I never got the chance to finish it so here it is! The final days of my residency were quite intense but very satisfying. On Sunday I successfully exposed my latest graphite drawing as a photopolymer plate. Here is one of the first proofs. I forgot to mention the fact that all my prints are being printed onto cream Hahnemüle paper which accounts for the slightly pink/cream looking photos

I’ve been a bit obsessed with puddles in the forest and wanted to capture something of the feel of the pine forest after the rain.

It was also a beautiful afternoon on Sunday so I went for a long run with my camera to try and get as many photos as possible. I have built up a really good image bank that I hope will help me to continue my Swedish work during the winter months in the UK.

I then went into the studio with the intention of making some small monotypes of the autumn colour in the birch forest. However, I found myself making an enormous grey (not even black) monotype of the birches and it took me ages. I was so tired that I almost gave up on it but forced myself to finish. I think I wanted to make the most of having access to the huge press but it was a bit of a mistake. On Sunday night I thought it was an awful print but I looked at it in the cold light of Monday morning and it wasn’t so bad and will be useful as a reminder of things now that I am back home. Although it hasn’t travelled too well and will need resoaking. I packed all my prints up very carefully and they were fine but this was so big that I had to roll it and stow it in my case. Needless to say it is now squashed flat!

On Monday Ida Brogren, artist and illustrator http://www.syskonenbrogren.se, arrived with her camera and she took photos of me exposing the monotype transparency onto the photopolymer plate. Here are the two transparencies stuck together (there is a lot of overlap of ink).

Following all the steps described in my previous post, we exposed and developed the plate. I also exposed an identical plate using the same timings but using the aquatint screen that Björn had given me to see what the difference was. This is a picture (taken by Ida) of Christina and me examining the screens.

I’m chuffed to bits with the proof prints! (Here is the one made from the plate using the studio’s aquatint screen:

and the one made using Björn’s screen:

The dots on the above screen are more open and so you get a rougher and more grainy effect. It would be interesting on certain prints though and it is great to have it to start me off. Björn has also given me the details of the man in Gothenburg that makes the aquatint screen that I used. It would be a good investment for me to order one from him once I have made my lightbox.

I spent the rest of Monday printing and organising all my stuff for transporting back to the UK. I then found out that Modhir Ahmed was coming back to Ålgården to film people looking at his exhibition and then sharing their thoughts on his paintings. He arrived in the late afternoon and Ida stayed behind to help with the filming. She also made a beautiful meal for us of pea soup with creme fraiche and caviar with olive ciabatta and her friend arrived with the most delicious apple cake. It was a nice surprise because I’d intended working through and just snacking on a bowl of cereal! 🙂

Once we’d eaten, Modhir insisted that we were filmed looking at his paintings. I have to admit that I was a bit reluctant due to the large amount of work that I wanted to do on my last night but I managed to say a few words that I hope were meaningful before scuttling back to the studio. It got to about midnight and I decided that I needed to wind down a bit so I went to the lithography studio and made some acetate screens to take back to England. You may remember that this involves using a large and a small lithography stone with carborundum and water and it is a meditative thing to do. I made four which took about 25 minutes so I felt quite relaxed by the time I went to bed.

Tuesday was my last day at Ålgården and I was determined to say goodbye to the forest so I went for a 5 mile run in the rain. It was lovely with lots of jays and nuthatches flying about and I saw the friendly woodsman and was able to say goodbye to him too. I got back to the studio and Modhir Ahmed had a surprise in store in the gallery. He wanted us to come and look at his exhibition and in the night he had painted over all of his paintings in black and chalked a single English word on each. It was something of a shock but exciting too. He is a very interesting and well-respected artist in Sweden, full of ideas and energy. I found an article on the Ålgården facebook page that talks about it: http://www.bt.se/kulturnoje/konst/konstkuppen-malade-over-tavlorna%283472160%29.gm

I wasn’t able to do any more work but had the whole morning to pack everything up carefully and prepare a couple prints that I wanted to give to Christina and Björn and also one for Lennart who arrived just in time for my farewell lunch. He and Ute had made a print together for me too, I was really touched. Björn made veggie spaghetti bolognese and eight of us sat down to eat together. Then it was time to say goodbye 😦 Anna Mattsson kindly drove me to the airport and it was really good to spend the time with her. I managed to get through the luggage check in even though they had to mark my bag as ‘heavy’ and send it down the oversize baggage chute. They also let me on with a very heavy rucksack as hand luggage and a large parcel of prints. I was quite surprised but the plane turned out to be half empty so perhaps they were being generous with regards to the usual baggage restrictions.

I will really miss everyone that made me so welcome at Ålgården and I will also miss the fantastic opportunity to immerse myself in my printmaking without the pressures to teach or sell my prints. I already feel that it has been an extremely valuable time and I suspect that it will have a profound long-term effect on my printmaking and the way I view my work. Being amongst other professional printmakers in well-equipped studios exchanging ideas and learning new techniques has all the best attributes of being at art college but with the added maturity and insights that come from actually making a career from your artistic practise. I’ve been through some low points and some self-doubt but I have also reaffirmed the fact that printmaking is what makes me tick and is how I want to make my images. I find it exciting that, after eighteen years of printmaking, I am just scratching the surface of what can be done in one small area and now the photopolymer combined with my monotypes could be a whole new avenue for me to explore. 

I now have a really hectic couple of months with at least seven group exhibitions to prepare for and two printmaking courses to teach but I have light at the end of the tunnel in the form of the quieter months of December, January and February. I usually find this time quite uninspiring and my creativity is often at a low so I tend to just use it to restock my editions and prepare for the coming months but this winter I want to consolidate some of the ideas that I have had in Sweden, make further prints based on my experience of the forests and explore photopolymer printmaking further and see where that takes me. I need to build a light box but I have good advice from Christina and Björn as well as a good book on the subject and a friendly contact in the form of Rebecca Vincent at Horsley Printmakers (check out her lovely monotypes and etchings http://www.horsleyprintmakers.co.uk/rebecca_vincent.html).

I’ll continue to write here so please do check back in the future to see what I’m up to. Oh yes, I’m already considering the possibility of returning to Sweden once I’ve developed my ideas a bit further and also I am hoping that Art Connections will be able to develop their link with Ålgården. It would be great to see some of the Swedish artists in Yorkshire in the future and perhaps we could collaborate on something. Before I sign off for now, I’d like to say a huge thank you to everyone at Ålgården who made me feel so welcome and have become friends and also to Christine Keogh and Rick Faulkner at Art Connections for giving me this opportunity, it’s been just what I hoped for and more!

Vernissage(s)

Well, it’s been an exciting last weekend here in Borås. I’ve been continuing my experiments in photopolymer printmaking and have been to two exhibition openings (as well as a couple forays into the forest).

Modhir Ahmed, http://www.modhir.com/web/index.html, arrived on Thursday night. He is an artist from Iraq who has lived in Sweden for over thirty years and has an international reputation for his printmaking. He was here to put up his exhibition ‘Lord of the Earth’ in the gallery at Ålgården, where he is also a member. Friday was very busy with lots of people toing and froing in preparation for the opening and at lunch time we were all treated to a beautiful meal of smoked salmon and potatoes in a dill sauce (I’ve become a vegaquarian whilst I’ve been staying here as fish is a large component of most meals). In the evening, following my run in the forest, I went to the opening or ‘vernissage’ as they call such things here.

Lots of people came and when we were finally able to close the gallery doors for the evening, we all had a meal together in the Red House (the artists’ house where I stay).

Today was another busy day. It started with a lifedrawing session in the gallery. Our model today was Sassa, who was very good humoured and challenged us with no poses longer than 4 minutes and most were 2! It is interesting how the models lead the sessions here at Ålgården. All the life drawing I’ve ever done before has been led by the group, another artist or a teacher and the model played a passive role. I like the fact that the model is in control here. After the drawing, Anna Maria gave Ute and I a lift to another opening at a small town called Dalsjöfors. We stopped off at her house to pick up her husband, Peter, and were shown around their wonderful studio (they are both artists) and garden. The exhibition opening was for Ålgården member, Kristina Thun http://www.kristinathun.se/ who has been working every day since I’ve been here making beautiful lithographs and photopolymer prints.

I think her work is really atmospheric and her printmaking techniques are fascinating. She often uses up to seven different layers of greyscale to create her lithographs.

After that it was time to return to the studio and meet Anna Mattsson who had kindly offered to show me some techniques using wax including how to make image transfers and also work into wax on paper. It was really good fun and, during tonight’s run in the forest, I began to get ideas of how I might use it in my own work.

On the photopolymer front, I am currently waiting for two acetates to dry. I’ve created a much smaller version of the watery monotype that I did the other day. It was a two stage monotype but this time I wasn’t printing it and will be using it as a stencil so I needed to make two acetates to place on top of one another to create the whole picture. I used water soluble relief ink and that takes a few days to dry so I am now waiting (impatiently) for the acetates to be ready to expose onto my photopolymer plate. Ida has asked me if I will wait until Monday to make the plates so that she can come in and photograph the process. I agreed and am now glad that I did because I know what I’m like and if I wasn’t waiting for her, my impatience would have got the better of me and I’d have tried to expose them when they were still a bit wet and probably got them stuck to the plate 🙂 I’m also making another graphite drawing for a photopolymer plate and, all being well, will expose that tomorrow. A lovely surprise today was that Björn found an old ‘raster’ (or aquatint dot screen, as I now know it is called in English) that he’d made some years ago and he gave it to me as a gift to take home so that it will be easier for me to get straight on with my photopolymer printmaking. He also suggested that I prepare a load of films in the litho studio so I can take those home too.

I’m feeling really positive about this residency and the effect that it will have on my future printmaking practise. I’ve got stacks of ideas but also a real desire to experiment and push the boundaries of what I have been doing. I will talk more about that in another post but I need to get to bed now! I’ll leave you with a picture of Lennart and Kristina at the preview.

and Ålgården’s resident black rabbit 🙂

Adventures in Photopolymer!

Well, I promised that I’d write about my latest foray into photopolymer printmaking and so here goes!

To start with, perhaps I’d better explain what photopolymer is. As the name suggests, photopolymer is a light sensitive polymer. The material has been used in the commercial printing industry for years but in the last couple decades printmakers have adopted it and used it in a variety of ways to create original prints. I have used it myself and refer to it as solarplate because I use the sun to develop my plates. I first came across it when a good friend and fellow artist, Jon McLeod, was doing a residency at Highland Printmakers. I had just come back from travelling extensively overseas and was ready to create a body of work based on my travels. I wanted to include text and maps combined with my collagraphs but didn’t know how to. Jon suggested ImageOn film or photopolymer plate. He gave me a bit of a demonstration and I went off and bought a book on the subject. I basically taught myself everything I know (not a lot!) and have been able to make basic relief and intaglio plates using my photos and text which I then convert to pure black and white on photoshop and print out onto a transparency. This is then placed on top of a steel plate which is coated on one side with a light sensitive polymer (you can buy them from printmaking suppliers). The black part of the design blocks out the UV light and the clear parts let it through. Where the light hits the plate, the polymer hardens and where the black parts mask it, it stays water soluble. The great thing about it is that you can then wash out the black parts using warm water (no chemicals needed). The final stage is to expose the washed plate in the sun for a good hour or so to cure it and then it is ready for printing.

You have to do test strips to determine how much time the plate should be left in the sun and of course, the sun’s strength can vary due to the time of day and the season and you do actually have to have some sunshine in the first place! Many a day has been spent scrutinising the sky for a gap in the clouds so that I can develop my plates. I’ve actually got some good results with relief plates but my intaglio plates tend to have large areas of ‘open bite’ due to the fact that I can’t get mid-tones.

Anyway, I’ve been aware for a while that you can make really interesting photopolymer plates which will retain all the tones and fine detail of drawings and photos and will replicate the look of lithographs, etchings, drawings etc. Fortunately for me, Björn Bredstrom and Christina Lindeberg are experts in this field. Christina spent some of her valuable time teaching me to make the initial test strips today.

But…let’s not get ahead of ourselves! First you have to create the image that you intend to make into a printing plate and before you do that you need to prepare the transparency. This entailed using acetate intended for lithography. You need to roughen the surface of it to be able to draw onto it. This is a very satisfying process which involves wetting a large lithographic stone and squeegeeing your acetate onto the surface so that it doesn’t move about. You then add carborundum grit and water to the topside and take a smaller lithographic stone and grind it over the whole surface in a figure of eight for about four minutes. This gives you a surface with an even bite to it. You can then work on this with acrylic paint, graphite, tusche or any other light fast material. I used 6B and 4B pencils to create the transparency below.

The next step is to determine how long you need to expose your ‘raster’ for. I don’t know what the English name is but a raster is the Swedish word for an acetate with a random dot pattern on that replicates aquatint. You use it to pre-expose your plate before you expose it with your design. The tiny dots mean that you can get fine detail, mid tones and large areas of black without having ‘open bite’ (when you can’t avoid wiping out the ink from large areas of dark tone on your plate because it is completely washed away). I can’t explain it better than that so please google for further details if you haven’t already fallen asleep!

Christina helped me to make the initial test strip and Ida photographed the whole process (she is going to let me have copies) and made notes because she wanted to learn too. We had to cut a piece of the photopolymer plate and then mark a sheet of paper with sections and the timings written underneath. The numbers look odd because they are units not actual minutes and seconds.

I forgot to mention that we are not using the sun. We are using a rinky dink all singing all dancing light box!

You also have to make sure that you don’t expose the plate to light whilst you are in the process of preparing it. It is not so sensitive that it has to be done in a dark room but you do need to keep it undercover when you are in between stages and it is best to cut it in a very dim room. Once we had cut a strip of plate, we then put it in the light box and lowered the glass down onto it, set the vacuum pump to make a good seal and then exposed the whole plate for 1000 units of light….what about the ‘raster’ I hear you ask? Yes, well, we forgot all about that and only remembered when we went to cover part of the plate to start the tests. Whoops! We cut another strip (it’s expensive stuff so you learn a hard lesson when you make mistakes) and this time we laid the ‘raster’ over the top of the plate and then lowered the glass and set the vacuum. After the initial exposal to 1000 units of light, we then covered the marked sections at 100 unit intervals so that one end of the strip had been exposed to 1000 units and the other end had had 1900 units. This took quite a long time!

Next we had to develop the strip so we took it to the wash room and under a yellow light we sat it in a tray of warm water (room temperature) for a minute and then a further minute was spent gently brushing the surface of the plate under the water to remove the unexposed particles of polymer (the black dots of the ‘raster’).

We then had to dry the plate. You can use a hair dryer but here we have a great little drying box. After 5 minutes in there, the plate needs to be cured with a full dose of UV light so back it went into the light box for 15 minutes. Phew!! What a process and it was only a test strip.

After lunch my job was to ink, wipe and print the strip to see which part gave us the best black. The part that was blackest would indicate the amount of units of light needed to expose the plate. Unfortunately the test strip was inconclusive because we realised that the ‘raster’ must have moved each time we lifted the glass screen. Blast! Björn also suggested that we clean the sensor in the lightbox before we made another test strip. This time he told us to divide a strip of polymer into three segments and expose it at 750, 1200 & 1500 units. From that we should determine the range that we would need to make a further test strip. We should stick the raster down with tape so that it didn’t move when we opened the glass each time. The numbers seem a bit random and this would also mean going through the process described above twice and it was now 4pm but Ida and I decided to do as we were told in order to be ‘professional’ 🙂

Thankfully, the three segments showed us that 1200 units gave a lovely velvety black tone.

Björn told me that I needn’t make a further test but I should expose my plate to the raster for 1200 units and remove it and expose my design onto my plate for the same amount of units.

So…I went back and cut a piece of photopolymer plate to the right size and put it in the lightbox with the ‘raster’ on top of it, the glass down, vacuum on and exposed it for 1200 units. I then took away the raster and replaced it with the transparency with my drawing on and exposed that for 1200 units. I went through the developing process, drying process and curing process and after about an hour, the plate was ready to ink, wipe and print. I could see that there was a delicate design on it and I was really excited.

I printed the plate and it is just amazing…you get a perfect copy of your drawing! The only slight downside is that I don’t seem to be able to get a ‘white’. There is an overall grey tone to the print. This could be to do with the process but I suspect that the timing on the exposure of the design needs tweeking. I’ll ask Björn and Christina when they come in tomorrow. I’m now really excited about the possibilities. I am wondering if I could do a reduction monotype on acetate and instead of printing it, I could allow it to dry to make a transparency that I could expose to the photopolymer and then get a plate with all the beautiful marks that you get from monotype but that you can print repeatedly…the possibilities could be endless.

The other thing I need to do is to work out how I can transfer this process to my studio at home. I have a book that tells you how to make a lightbox and Björn says that he has had good results just using an overhead bulb or an anglepoise lamp (the light has to be uv or ‘cold’ light) but you have to make sure that the light stays at a fixed point above the plate and the distance from the plate has to be the same as the diagonal length of the plate in order for there to be an even coverage of light. There is also the small matter of the litho stones and preparing the transparencies but I am sure that improvisation might be possible. Tomorrow I am going to make a transparency using monotype techniques and ink.

Monotypes

Well, I was going to talk about photopolymer tonight but I’ve just had a busy evening in the studio and I’m not sure talking about technical processes is such a good idea at 23.00. Bear with me, I will go into some detail in my next post 🙂

I forgot to mention that I now have a housemate. Ute is from Kiel in Germany and, having enjoyed her visit last year, she has come back to Ålgården for two weeks of printmaking. She has a project that she would like to complete and has already been busy making drypoints in the studio. She’s good company and we went on a little trip to Alingsås with Lennart this morning. The idea was to visit Lennart’s favourite organic food store, the red cross second hand shop and then to have pizza in what they both promised me would be the best pizzeria ever! I’ll admit that it was pretty good and it has to be the cosiest and most colourful restaurant I’ve been to in a while. The organic food store was wonderful and I came back laden with apples, a squash and some chilli chocolate (for emergencies).

I

The drive was lovely too. The autumn colour is really beautiful at the moment. The forests are a patchwork of green, yellow, golds, reds and oranges. I’ll take some photos if the rain ever lets up!

Yesterday Lennart brought in one of his cast bronze sculptures to show me. He knows I’m  a big fan of crows and I love this one, it is so full of character and has a real presence when sat on the table next to you.

The rest of the day has been a good one. I had a sleepless night last night (possibly caffeine related!) and found myself mulling over what to do and where to go with my printmaking in order to make best use of the next few days. I knew I’d be making a photopolymer transparency but I couldn’t decide what to do for that either. So when I got back to the studio today I was really strict with myself and promised myself that I wouldn’t leave it until the transparency was drawn out. I made several starts before settling on a birch wood. I figure that it will be nice to have a few different kinds of prints of the birch forest to compare techniques. I’ll expand more on the process in my next post but once I’d finished the drawing, I felt in a really good mood and ready to make something else so I decided not to go running today in case I broke the spell and instead I holed up in the studio all evening. 🙂

I’m still frustrated about not being able to depict the pine forests and so I went back to basics and decided to do a reduction monotype. I figured that if I did it in two stages, I’d get around the problem of how to depict the dark trunks but still have a darkish background and the light coming through the trees. It took me about three hours to complete and I was using water soluble ink so I was a bit concerned about re-soaking the paper after the first plate was printed. The result was that when I printed the second stage on top of the first, the ink didn’t transfer so well because it was drying out and the paper was drying out. However, I am happily surprised by the result.

It still isn’t how I’d envisaged it but strangely enough, the ethereal pines against the very watery looking background captures more of the atmosphere that I experience on my rainy runs than I would ever have imagined that I could achieve!

I had printed the ‘ghost’ print (the traces left on the plate after the first printing) and ironically the paper was too wet so I got a really abstract result but when I printed the ghost trees over the top, because there was still a lot of ink left on the plate, I got an interesting second print.

I had a happy evening working tonight and Ute and I seem to work really well together. We are both quiet and keep ourselves to ourselves but when we hear the press going, we both tentatively wander over for a peek at each other’s work and it is a nice combination of having privacy to work but encouragement and an opinion if we want one.

I’m keeping my fingers crossed that I can get Christina or Björn to help me expose my photopolymer plate tomorrow. I will report back with my progress.